The huge difference between left and right, is photography composition important?


“We hear of the golden ratio, the rule of thirds, but are these seemingly professional methods of composition actually essential to a photographer? Today we will leave these composition rules aside, and look at how characters and objects should be placed in order to achieve the look and feel you desire in your photos.”


The general consensus is that composition is something that has to be done right all at once during the photoshoot, however, unless the photo shoot is done in a studio, it is rather difficult to get the composition all settled at once while shooting. There will often be all sorts of reasons that will result in the need to crop the image afterwards during editing to reframe the composition. But how should we approach composition exactly? Many tutorials will speak of the golden ratio, the rule of thirds and complicated things such as perspective composition.


But what exactly would be considered a good composition? I, personally, think that all these rules of composition as nothing more than smoke and mirrors. I think that above anything else, images that can “get its point across to the viewers” are to be considered the best kind of compositions.


There are no definitive formulas to photography composition, as there will be all sorts of suitable compositions depending on the different theme and settings of your shots. When I mentioned previously that all these rules are smoke and mirrors, it’s because the real reasons that decide whether a picture looks good or immersive or not should be explored through “cognitive psychology”. Human eyes are prone to trickery, if there is even one hint in an image that can trigger a person’s imagination, that picture can be said to be a “heartfelt” one.

A lot of “professionals” would tell you not to put your subject right in the middle of the frame, because it doesn’t look good. But is that really the case?

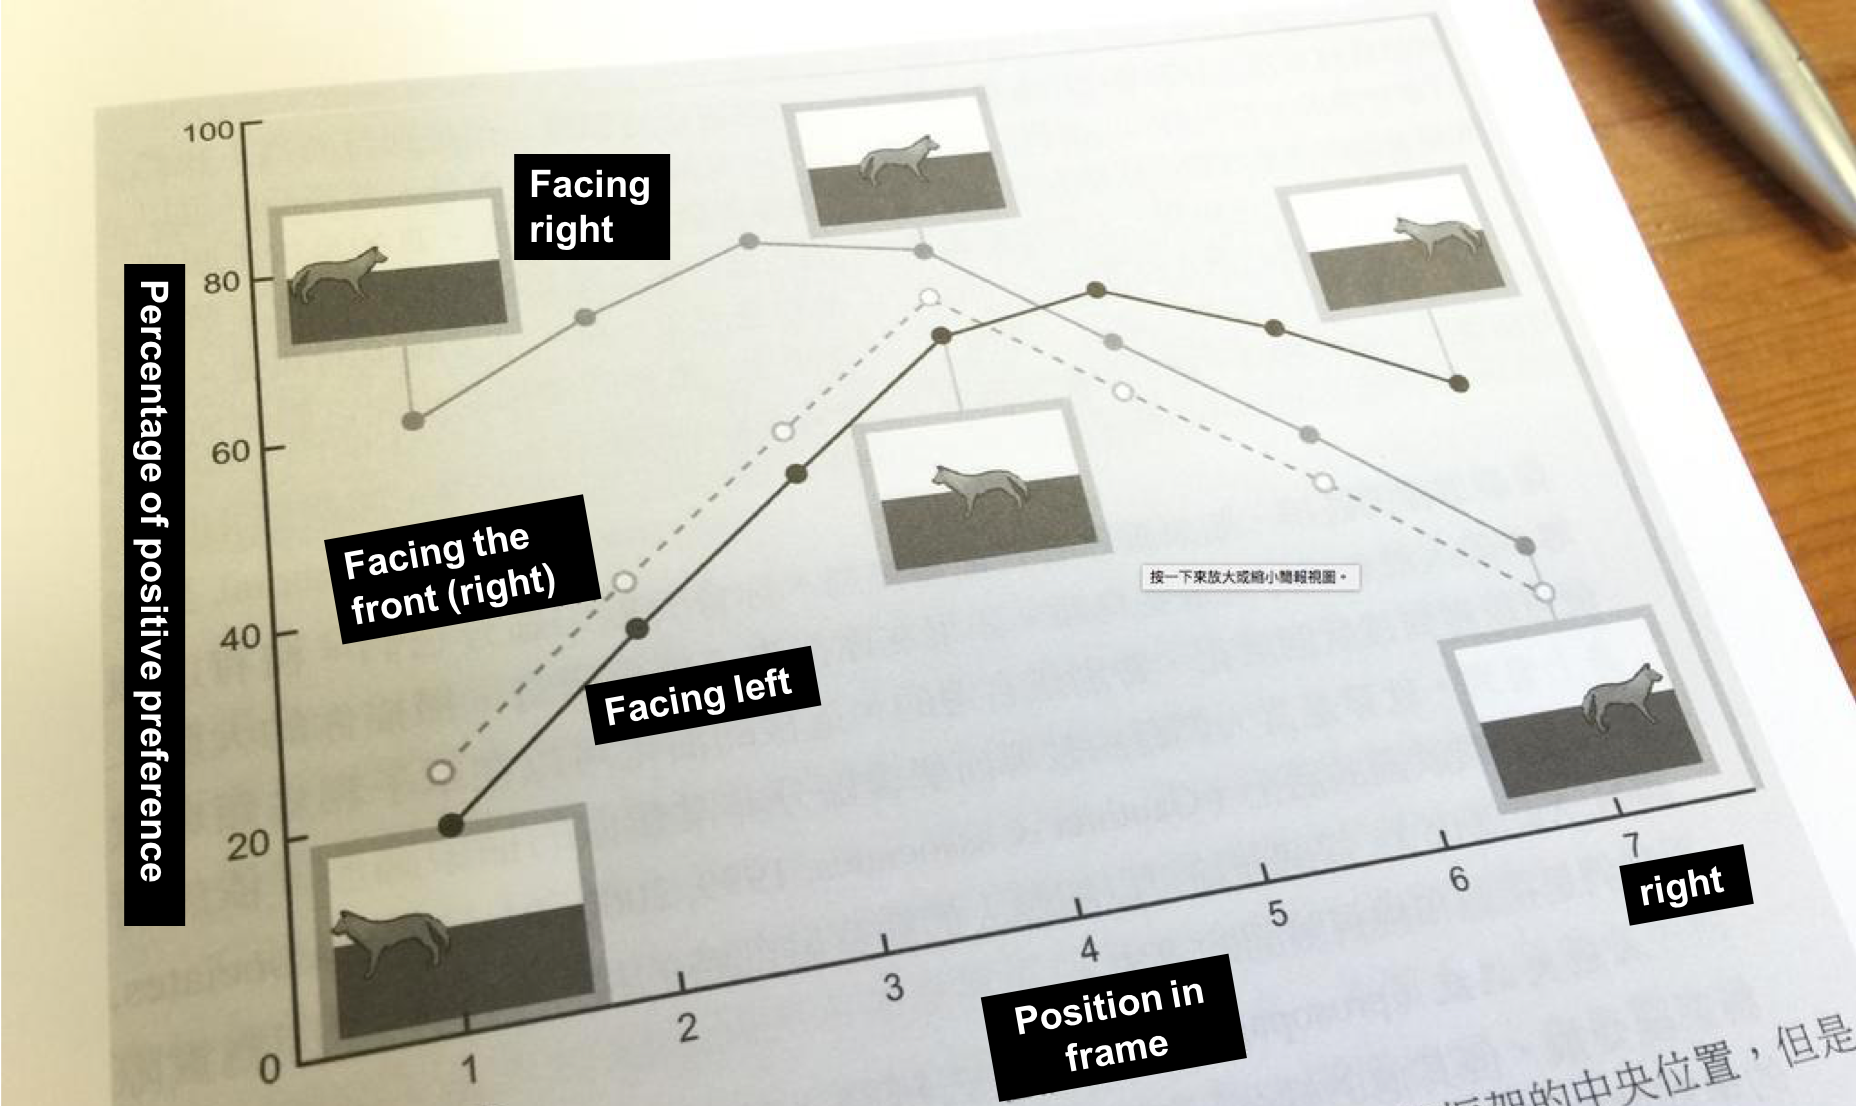
It is discovered through cognitive psychology experiments, that test subjects actually mostly prefer compositions where the main subject of the scene is placed right in the middle of a photo. And when the subject is facing the edge of the frame, as in when the dog is facing the left and framed on the left side of the photo (or vice versa), test subjects tend to like it less compared to compositions where the subject is framed in the middle of the shot.

You will find that, after observing the results of these experiments, the elements that actually affect people’s preference of a photo actually has little to do with the rule of thirds or the golden ratio and such. What really attracts people are the imagery formed by the poses and positions of the main subject in the frame. We’ll do a little experiment with the image below:

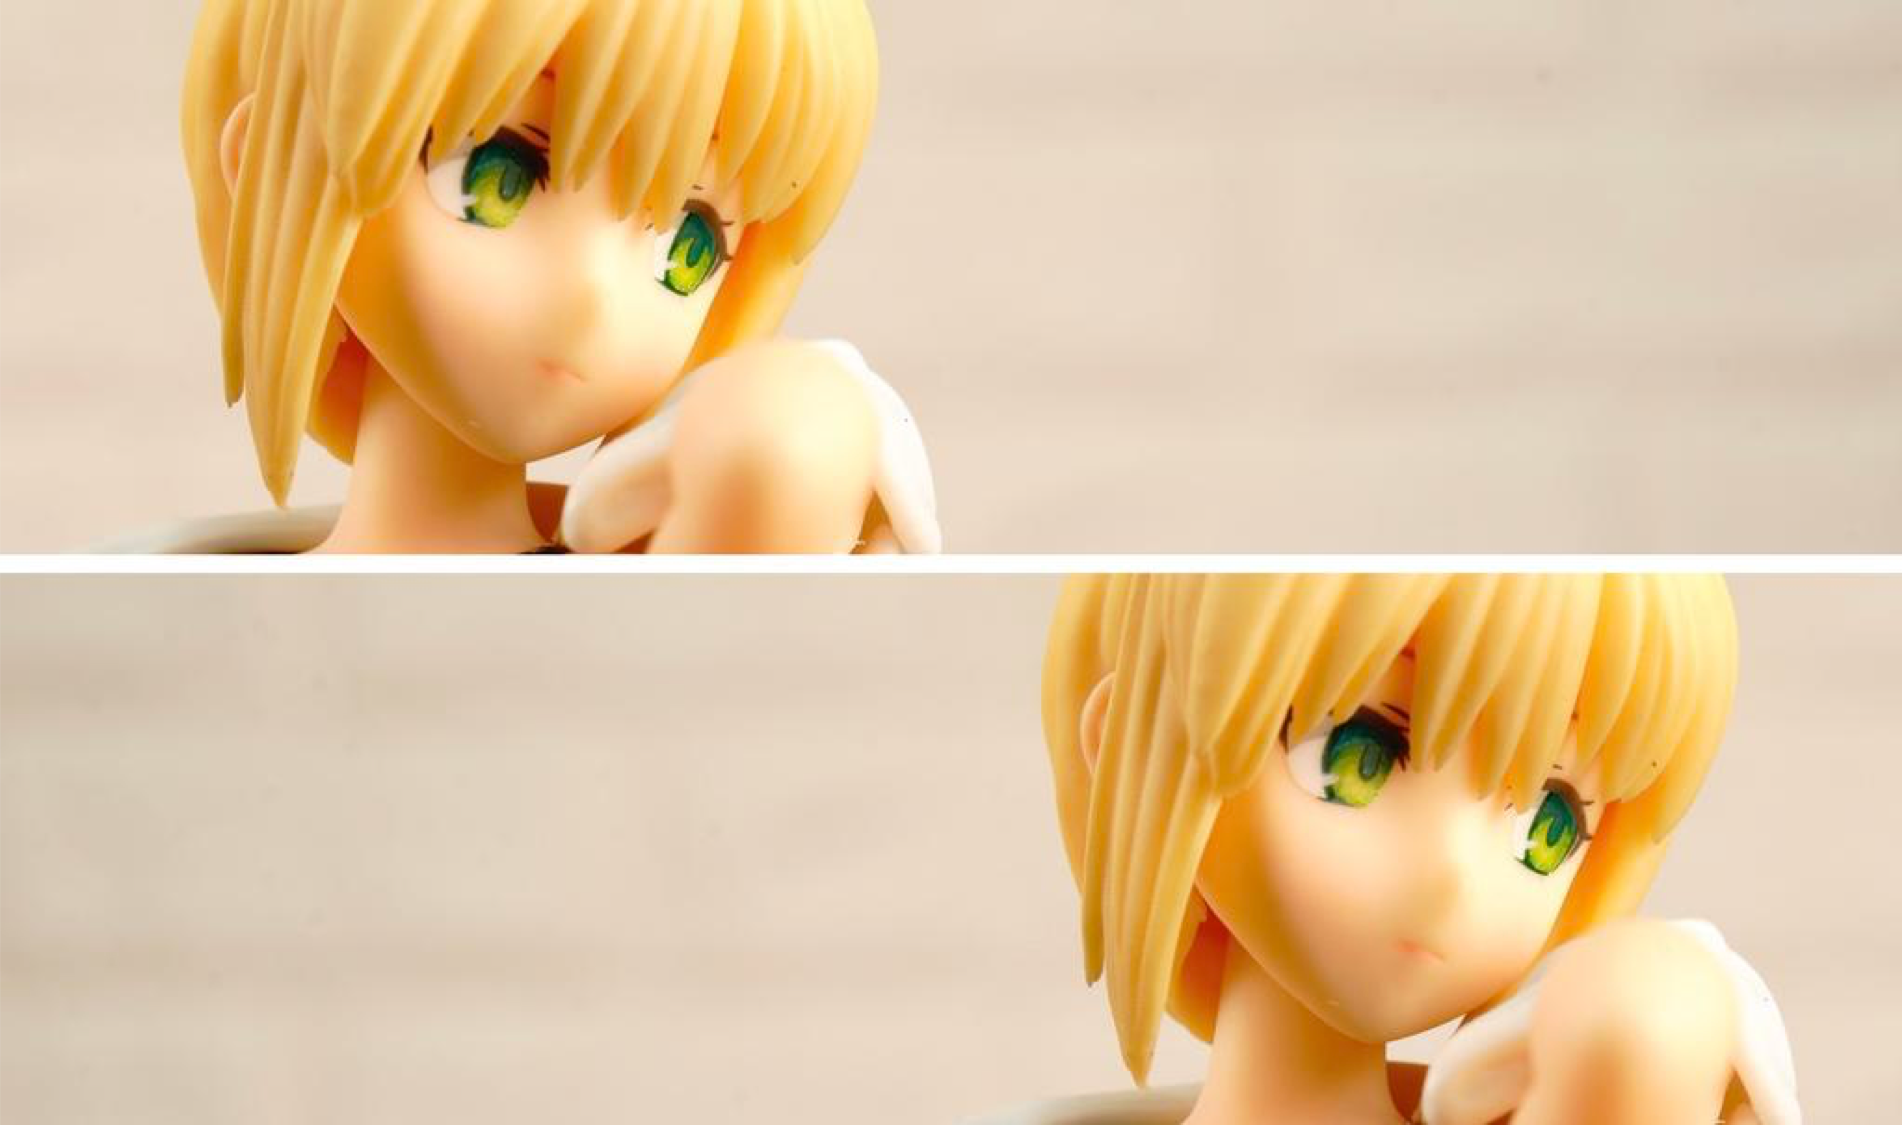
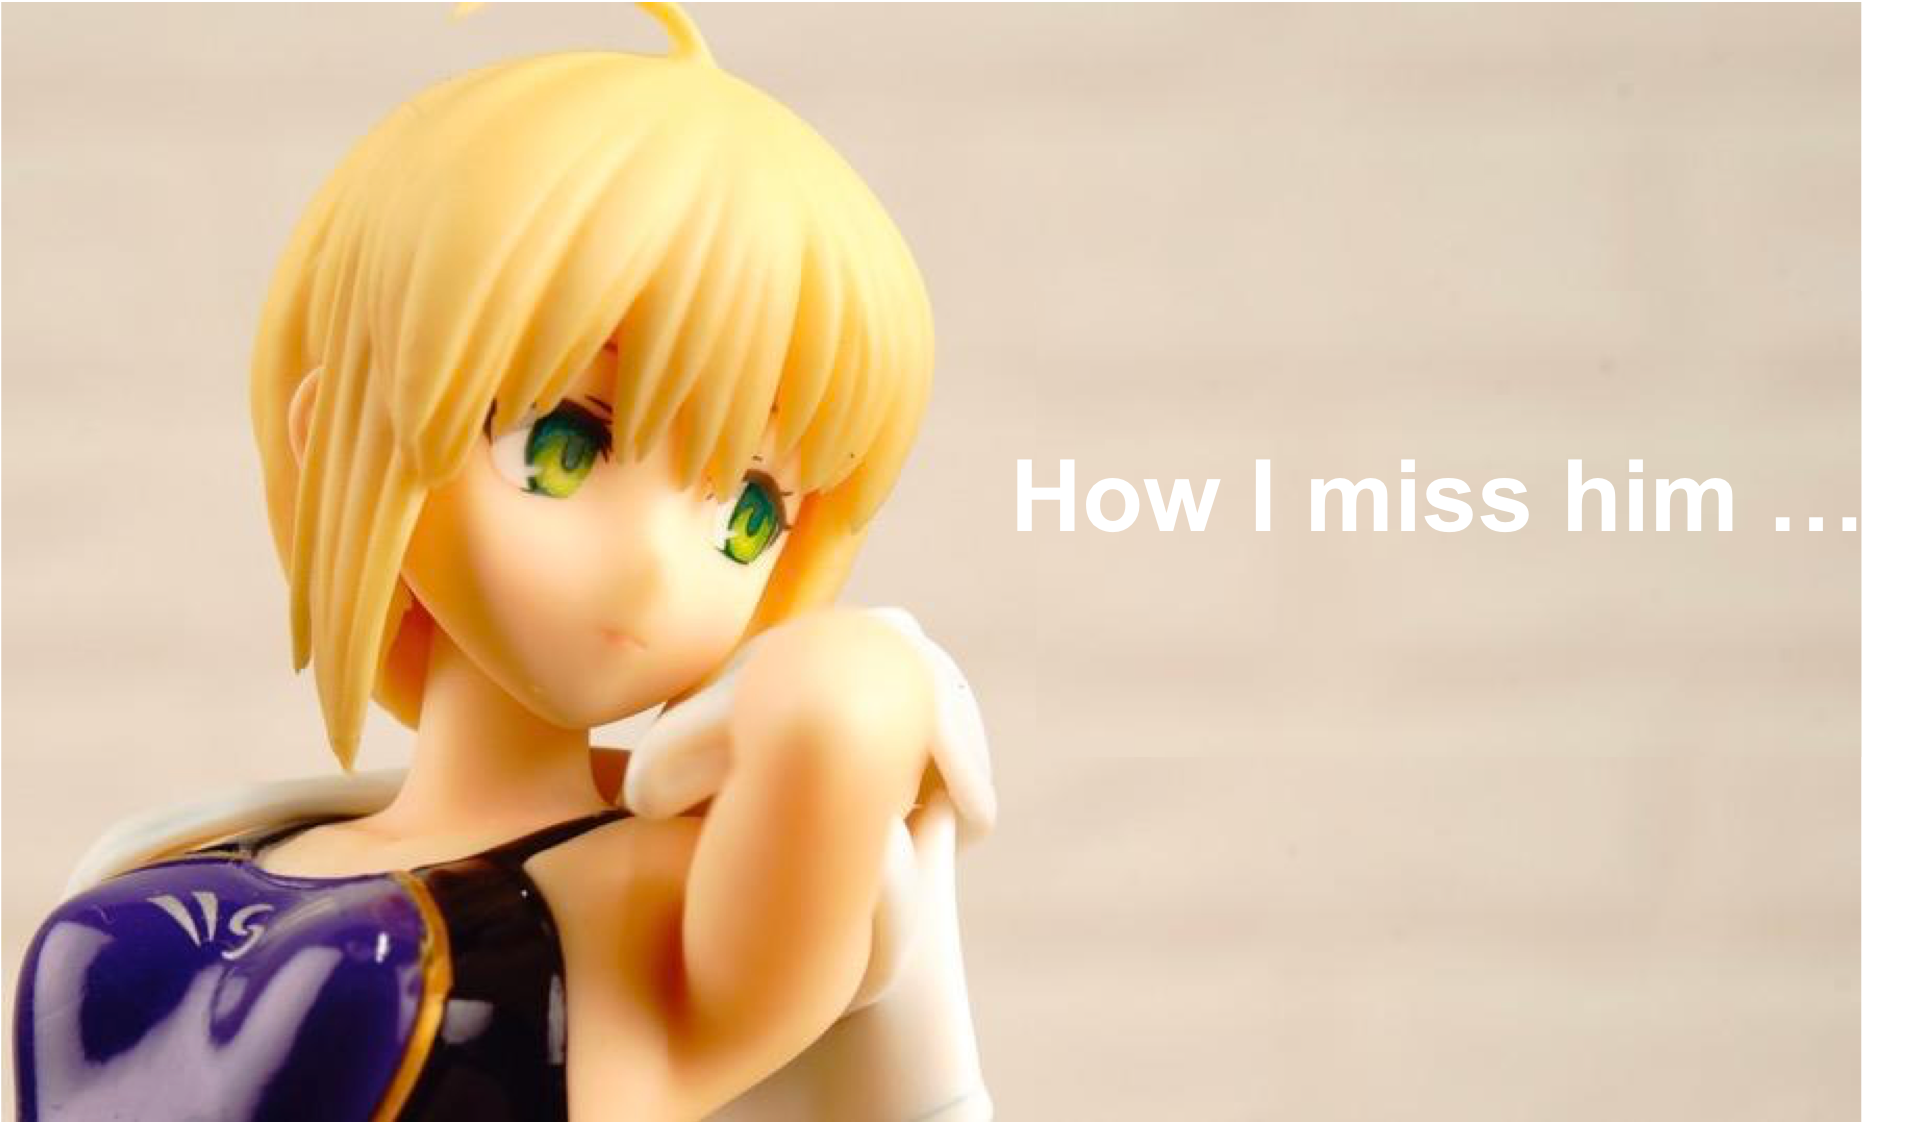
I have placed Saber right in the middle of this picture, and thanks to the high resolution of the D800E, I am able to crop the image and place her either on the right or the left of the frame without the image becoming too low quality to be used. This Saber figurine also happens to not be looking into the camera, so we can do an experiment here similar to that of the one with the dog.

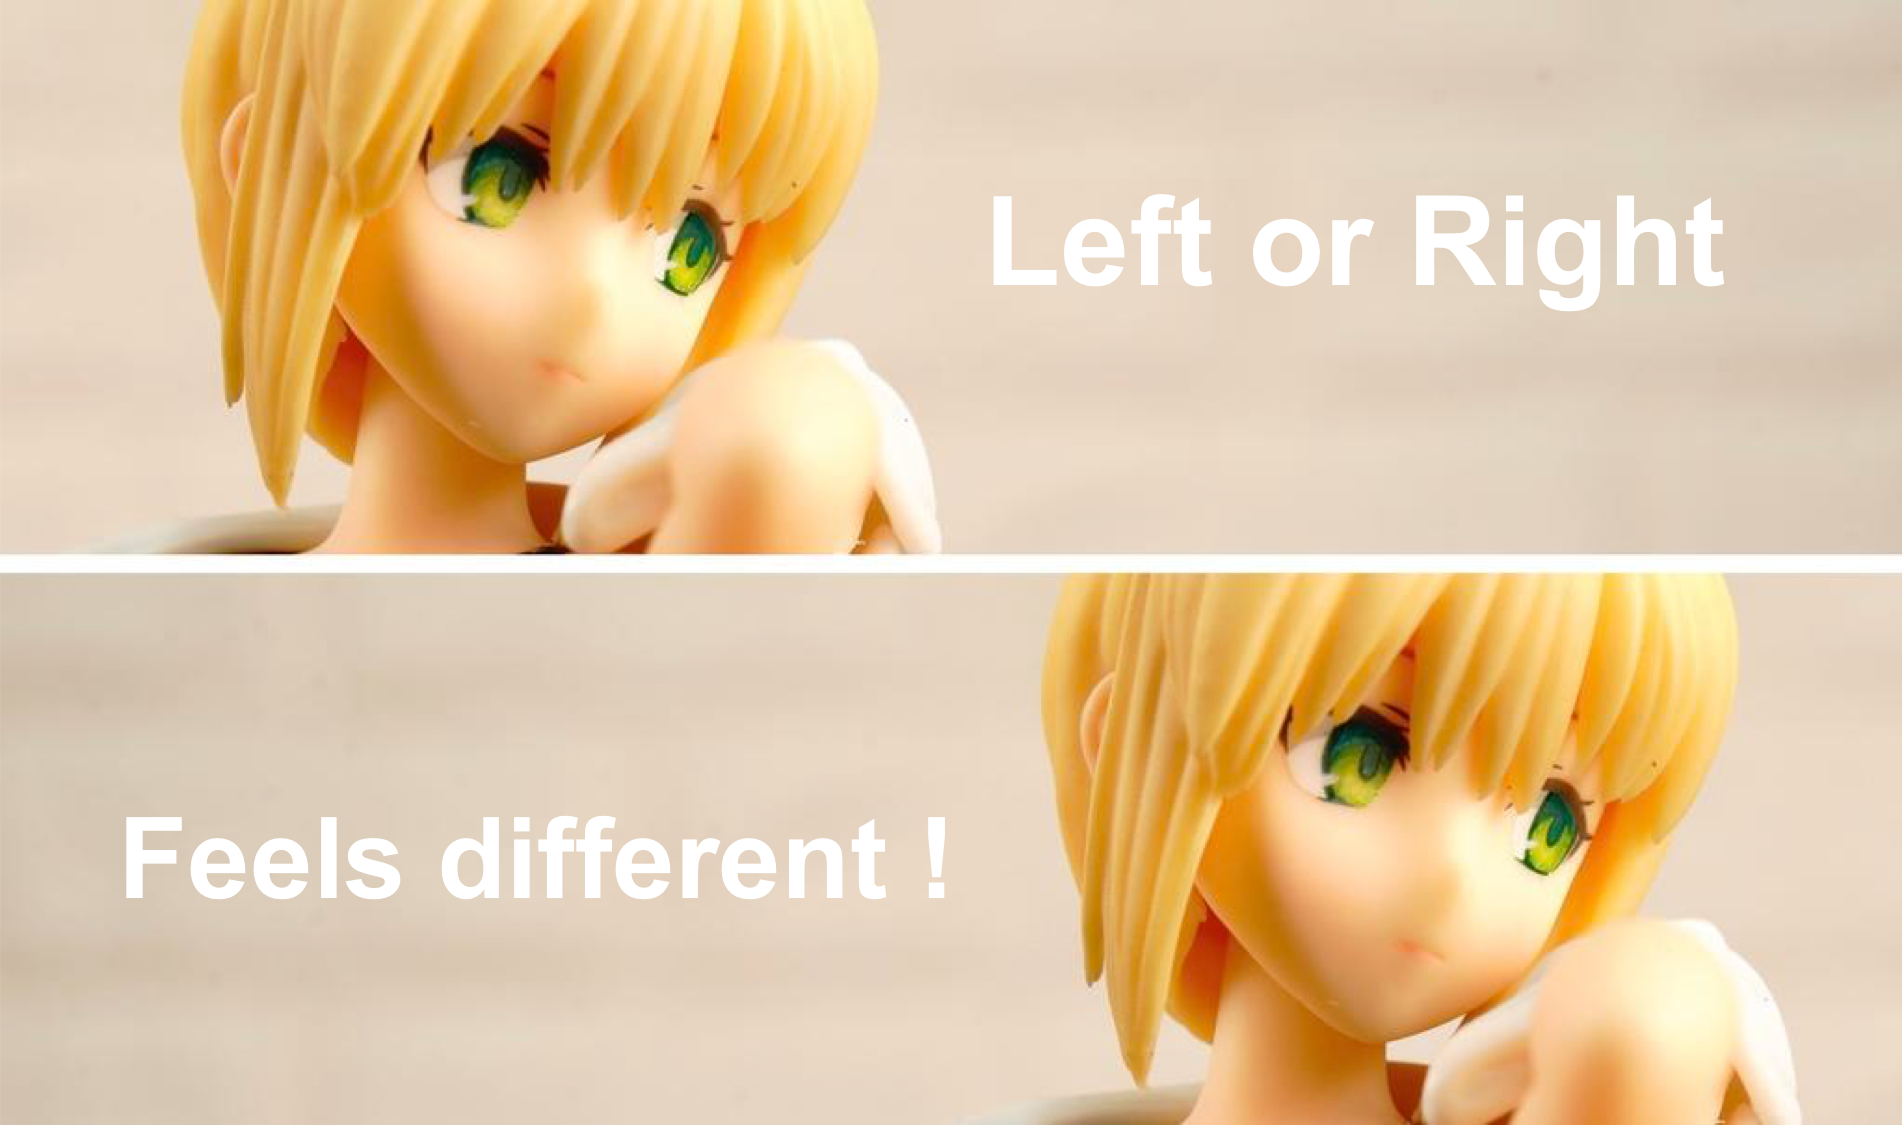
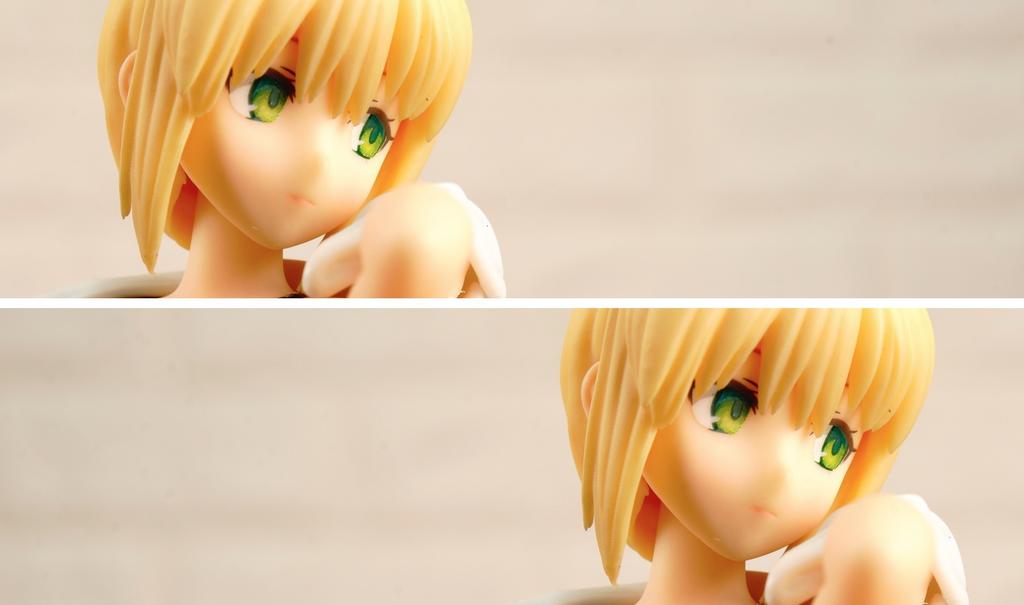
I crop the image of Saber into the two versions displayed above, one where she’s one third to the left, and the other where she’s one third to the right. Don’t you think these two pictures give out very different vibes? Now let’s add some words to the pictures to further demonstrate the differences these two pictures’ radiates.

When Saber gazes at the middle of the image, the shot will emanate a sense of deep yearning and longing, with the words “how I miss him” is just appropriate.

But what if it’s the other way around? All in a sudden, Saber’s gaze became a crestfallen, dispirited one, much befitting of the words “let’s break up”.

The two images are cropped from the same photo, but because of the different framing of the subject, the direction of the gaze gives the two pictures completely different feelings, appearing from longing to separation within the snap of a finger. So what do you say? Is cropping for composition important? Of course, it is! Because different compositions can completely alter the way an image will be perceived by its audiences.

But are the so-called composition rules important at all?

Look at this image above, where the person is placed right in the middle of the frame, do you find it to be unappealing, uncomfortable and unlikeable?

I would not assume so. No one is going to think twice about the rules when there’s a pretty girl to see. Who cares about composition? Human eyes are easily deceived, so instead of thinking about how to “composite” your images so it follows the rules, you should rather ask yourself this: does the way you crop your photo actually allow it to convey what you want?

If you are interested in our articles, you can also LIKE our page:)

Want to see more related articles? CLICK ME to enter the Chinese version website.

Can’t have the best of both worlds? Lesson on how to shoot clear night + portrait photography!


“Those who love travelling and photography are bound to find that there are many specific attractions where its full glamour can only be captured when the sun is down and lights are lit. But how should we take care of the background in the darkness and the sparkling neon lights at the same time? What about the person that is to be included in the shot? This article will be focusing on nighttime portraits, using a complete example to demonstrate and provide explanations.”


There must be plenty of night views or views with neon lights and such that you’d what to photograph during your travels. Although night photography can be done rather simply by setting a longer exposure time when using a DSLR, if you want to include a person in the shot… that would require some skill.

The attraction this time is the Gundam statue in the “DiverCity Tokyo Plaza” in Japan, this 1:1 Gundam model that looks better at night (because of the lights) is not that difficult to shoot on its own, but proves to be much harder when you want to include a person in the shot. So this will be our example today.

Why is it difficult to include a person in the shot?


Because the Gundam square is a very very dark and small park, aside from the Gundam itself that is bright, everything around it is as dark as it gets. Therefore if you adjust the exposure setting according to how you could capture the Gundam clearly, the person in the photo you get will come out dark like this.

But what if you extend the exposure time to brighten up the person? Then the Gundam will be overexposed!


Therefore night photography with a brighter background like this can prove to be quite challenging, but as long as you have an on-top camera flash, the problem will be easy to solve! If you are using series such as the Sony A7R or Canon 5D that does not have an equipped flash… then remember to bring a mini speedlight in your bag with you. That way you can have it by your side whenever you need to use it outside.

The example image is shot using a 35mm lens, the camera placement will be brought up in the end, it’s placed in a spot that can shoot the person from waist up + taking in the entire Gundam statue.


The image above is used to explain the “aperture problem”, I have the aperture set at f22 for this photoshoot, because if the aperture is any larger than this, then while the focus in on me, the Gundam behind will be dropped out of the depth of field and become blurry, therefore shrinking the aperture is a must!


Note: Regarding the depth of field problem, please see:【Understand the DOF scales and hyperfocal distance, manual focus will be made simple.

Don’t need to care too much about the brightness of the person in the screen (because the person relies on the speedlight to fill in the brightness)


Since the aperture is set on a very small value, the shutter time will need to be extended. Take for example this shot, when I have the setting on f22, the ISO needs to be adjusted to 1600 in order for the shutter speed to be less than a second. If your camera can’t meter or focus properly in settings such as this Gundam square, then go straight for the LiveView mode to get a preview!

As for the flash, I directly adjusted the setting of the on-top camera flash to M mode. This is because if I let the camera use its TTL setting, the Gundam’s brightness itself will often affect the camera’s judgment, causing the flash to not deliver a correct output. Due to the dark location, small aperture and the low built-in output of the on-top camera flash, I chose to directly set the flash to full output for this shot, you can go try it for yourself.

Note: For speedlight settings please see: 【Dedicated to new photography fans, three key methods for the operation of Speedlights

After finalising the setting and focus, you can snap a photo of yourself with the self-timer mode! The above image is the result of using the on-top camera flash, although the skin colour isn’t rendered nicely due to the direct flash, compared to the shots where the person’s either too dark or the background is overexposed, a travel photo like this can already be considered quite decent. At least you got a clear shot together with Gundam.

Furthermore, don’t worry about the long exposure time (the image above was one second) causing the portrait to become blurred. Since the location is dark, the on-top camera flash will already be able to produce a “frame freezing” effect, therefore unless your exposure time is even longer than that (over one second), and you can’t stop yourself from moving, then just the flash alone would be able to freeze your image for you. When metering, just focus on the Gundam, don’t worry about the lighting of the portion of the portrait.

As for where you should place your camera? Remember the beam of light in the picture above, just place your camera on that spot and use a 35mm lens, you will be able to get the waist up portrait + the whole Gundam in one shot like in the example. Just remember to decrease the aperture size, unless you want a blurry Gundam in your final picture.

If you are interested in our articles, you can also LIKE our page:)


Want to see more related articles? CLICK ME to enter the Chinese version website.

The 5 main thoughts on shooting proper wedding photos!

“My fellow photographers, you’ve probably more or less have had the experience of being invited to shoot some wedding photos. In the dimly lit banquet hall filled with friends and families moving about, how should one approach the feat of handling the entirety of the wedding procedure? Should you try and eternalize every precious, fleeting moment? This sure can cause a lot of stress! In this article, I will share five thoughts and suggestions on how to properly handle wedding photography, and hope that it will be of use to you.”

Continue reading “The 5 main thoughts on shooting proper wedding photos!”

Magic Hour! Bringing you the most exquisite scenery shots

“Are you a beginner photographer who likes to shoot scenery? Do you also want to obtain professional results? Then make sure you don’t miss the moments where the light in the sky is the most beautiful, the magical time in each day people call the Magic Hour. This article introduces beginners to the concept of Magic Hour, Golden Hour and Blue Hour.”

A lot of people who are interested in photography have heard of the saying Magic Hour, but most only know that it happens around sunset, and can’t say for exactly when it begins and when it ends. This lesson contains content shared by photopills, explaining the best moments to shoot during the Magic Hour with image examples and text, this is not something you should miss.

First, there is no official definition of the Magic Hour, but it can be roughly categorised into two phases, the Golden Hour and the Blue Hour. During the Golden hour, the sun is shining from a low angle in the sky, the cooler colour light is hard to be caught by the eye due to refraction, leaving a soft and diffused orange-reddish light, resulting in what we know as the sunset scenery.


When the sun is near the horizon(below 0.5 degrees, as will be explained later), and if the weather is pleasant, the moon will already be visible. At that time, the sky and the moon will have a similar exposure, and it will be easy to capture images where the sky, scenery and the moon are all equally and correctly exposed.


Blue Hour

This is when the sun has already set below the horizon, though with its light still visible. A gradient from cool to warm colours can be seen in the sky, and is a good time for moon photography.

Then when during the Golden and Blue hours should we shoot? Due to there being differences as to when each phase will occur depending on your location and seasonal changes, the correct way to determine these phase is to calculate the elevation of the sun and convert it to time(same as calculating the time of sunrise and sunset), see the below image:


Blue hour (from -6° to -4°)
Golden hour (from -4° to 6°)

What time does it start then? You can download the app by photopills(only available for ios), but it is not free. The other method is to use another free application that we’ve introduced before called golden-hour. Below is a brief tutorial:


There actually isn’t many settings to be adjusted, the moment you enter the website it will automatically calculate the start time of the Golden Hour according to your location(ex. On 12/6/2014 it starts at 18:36), and to know the end time, look to the bottom right where it says Twilight and select the degree where the Blue hour ends(-6 degrees), the calculated time will then appear on the right-hand side where it says “Set”(Rise is during the morning). On the green row below you can choose another date for the calculation, it is extremely convenient.

But alas, whether or not a photoshoot will be successful also depends on the weather of that day. If it’s a cloudy day, sunlight will be reflected onto the clouds, making it rather atmospheric and unique; if the sky is clear, sunlight would not be disturbed, resulting in clean and fair images. Lastly, I wish for everyone to be able to take some satisfying photos during some Magic hours this summer.

If you are interested in our articles, you can also LIKE our page:)

Understanding these will allow you to easily play with filters

“Professional post production can be as complicated as it gets, but just by acquiring the basic knowledge of the different attributes, you can also easily salvage mis-shot images, and even develop your own unique visual style. This article will explain the purpose and relationships of the four attributes ‘exposure, contrast, tint and temp’, and how to adjust them using Lightroom.”

Continue reading “Understanding these will allow you to easily play with filters”

Achieve professional results for your portraits with some creativity!

“Under the insufficient condition, a touch of creativity can come a long way. This article will share to you photographer Karel Donk’s process of making a portrait for the president of the Republic of Suriname on the spot. Of how he managed to take a portrait of professional quality while not being in a professional studio.”

A photographer could receive random job calls through the day. Sometimes it is to shoot commercial products, sometimes to shoot models… but this photographer was approached with a unique job opportunity— to take a portrait of the president!

Without any preparation, photographer Karel Donk received a call from the secretary department of the Republic of Suriname(a small South American country with the population of 567k), asking for him to make an official portrait for the new president. Such is a rare opportunity, the photographer naturally decided to take this job, but due to the limited amount of time available, he did not get to make much preparation for the task. He, therefore, decided to answer the call with only some basic equipment, including three ordinary speedlights, a small softbox, some light filter of different colours and a reflector.


The photographer only got the chance to come to the shooting location a mere half an hour before the official shooting, and this meeting room is the location.


But how could one obtain an extraordinary shot at such an ordinary location? The photographer decided to use the national flag of Suriname as a reference. Since the president is the leader of the nation, then he’d be represented by the yellow star on the flag right?


But directly shining a yellow light on the president’s face simply could not do. So what he did was place the speedlight with a yellow filter above the president’s head as top lighting, so the president is illuminated by a yellow shine. This is the first speedlight he used, he then employed another one in addition to a softbox to shine from the side, so the president’s skin appears in a normal colour. Finally, a reflector is placed on the opposite side to decrease the amount of shadows.


Lastly, he used the speedlight with a red filter to illuminate the background, in total, three speedlights were used.


An outstanding portrait need not be shot in a professional studio or with the use of the best equipment. With some careful consideration, ordinary equipment can be set up nicely in an ordinary room to achieve results that are just as professional and exceptional.

Take a look at the image below for the settings used by the photographer.


From top to down: The red speedlight that hits the back wall directly, the yellow light that hits the top of the president’s head, the flag, the president in the middle, with a silver reflector on the right side. The one on the left is a softbox speedlight, with a Canon EOS 40D camera on the bottom.


Source: Karel Donk
photoblog.hk

If you are interested in our articles, you can also LIKE our page:)

The lighting for food is important? Let Tastemade tell you!

“After acquiring the basic skills of food photography, if you want to take your photography game a step further, achieving tasteful results like seen on the famous food website TasteMade, you simply cannot go without the aid of proper lighting. This article is written to instruct people on how to properly light their food, and up their game in food photography.”

Continue reading “The lighting for food is important? Let Tastemade tell you!”

Methods on shooting interior lighting

“In the bustling commercial state we live in today, neatly polished commercial photos can be seen everywhere from subway stations, bus stations, to the side of buildings, buses, subway trains, and even on our phones and computers. Friends, who are interested in photography, have you ever thought of how these shots were created? This article will discuss and share with you three basics points when shooting commercial photos, focusing on aspects of its lighting, metering method and model positioning.”

Continue reading “Methods on shooting interior lighting”

Methods on shooting in the interior of a car

“How should we approach shooting lively and polished commercial photos in the cramped and often dimly-lit interior of a car? This lesson will walk you through in detail starting from the choice of lenses, the control of lighting, the position of the cameraman to the posing of the model. Even if you don’t shoot commercial photos, you could still employ the same techniques in the future to get nice and pretty shots for your family and friends in the interior of a car.”

Continue reading “Methods on shooting in the interior of a car”

How to solve the problem of redshift during post-processing.

“Those with more experience in photography must have had experiences with using vintage lenses on a new DSLR with an interchangeable lens mount. Plenty of old-fashioned lenses are able to produce unique and tasteful photos, however, there are bound to be some issues when pairing old lenses with new cameras. This article addresses the Flange focal distance and redshift, in hopes to provide aid to those who are exploring interchangeable lenses.”

Back focal length is a very important value when it comes to designing lenses, it, however, has a different effect than the Flange focal distance on cameras with interchangeable lenses, therefore the ways to deal with the problems are also drastically different. This article will explain to everyone the difference between the Flange focal distance and back focal length, in addition to solving the “redshift” problem caused by ultra wide angle lenses with short back focal lengths using LightRoom. If you have encountered similar problems, I advise you to read this article carefully.


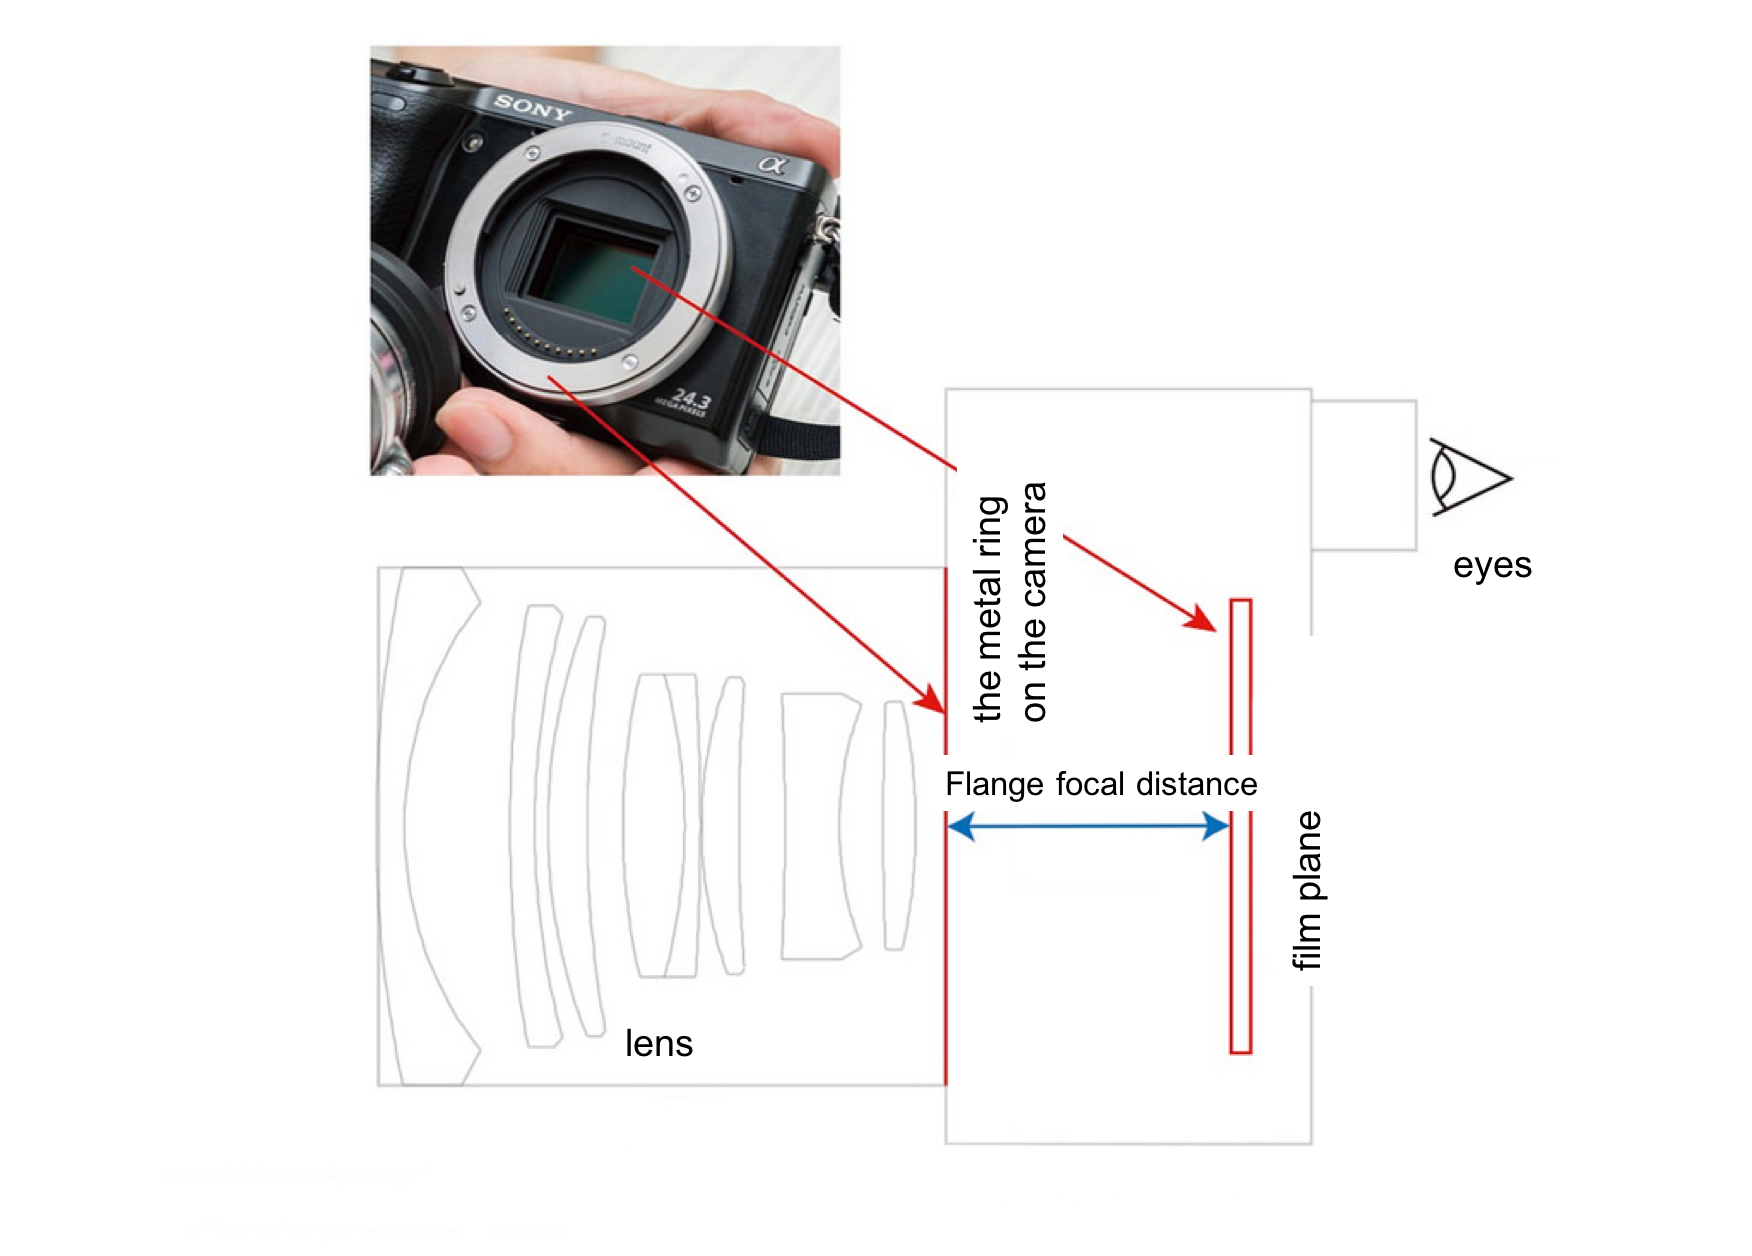
The so-called FaLan distance refers to the distance between the mounting flange of a lens and its image sensor/film plane, the proper English term is Flange focal distance, “FaLan” being the transliteration of Flange. The Flange focal distance can only be found on cameras or video cameras that “can change lenses” because this value must be taken into account when pairing and focusing lenses from different series. Why do cameras with a non-changeable lens not have a Flange focal distance you ask? Well, since it does not have a mounting flange, of course, it won’t have a Flange focal distance either.

For lenses with different Flange focal distances, we could use lens mounts and adapters to extend the length of the Flange focal distance when mounting the lens on different cameras. Then what about the back focal length?

If we’re only talking about the design of lenses itself, without considering how it will be mounted on cameras, then to those studying optical design, only the so-called “Back Focal Length” will really matter. Back focal length refers to the distance between the last piece of the optical lens in a camera lens and its image sensor/film plane and is an important value in the design of optical paths in lenses. Even for lenses with the same Flange focal distance, the design of the back focal length will still differ depending on the structure of the lens, please see the image below:

Both lenses in the image above are compatible with the Leica M mount, therefore they both have the same Flange focal distance (can be used with cameras from the Leica M series). But you can clearly see that the 28mm lens on the left has a whole extra section protruding from it compared to the 35mm lens on the right (there’s a lens inside), this is what it means by “having the same Flange focal distance doesn’t necessarily mean the back focal length will also be the same”. The lens on the left has a shorter back focal length, therefore the last piece of the lens will protrude from the mount. Go give a look at your own lenses, it’s the same logic when you see some lenses where its rear protrudes from the mount, while others don’t.

The reflex mirror of some SLRs may collide with the rear lens of some lenses when interchanging due to the back focal length of the lenses being too short, this is usually called “collision”. To address this issue, most camera body manufacturers will provide the correct Flange focal distance and the maximum distance that “won’t result in collision” to the lens designing factories, so that they can avoid this problem when designing their lenses. However, in the case of mounting products from different factories (ex. Leica R lens to Nikon SLR), the solution will have to be to alter the reflex mirror or the length of the lens rear.

All that being said, as long as the Flange focal distance is correct, basically any lens can be mounted onto any camera (leaving the sensor size out of the picture for now) and function normally. But if the lens in question is special(generally speaking it will be the case of ultra wide angle lenses, since the back focal length of these lenses are usually shorter), there may be problems such as collision with the reflex mirror (in the case with SLRs), collision with the image sensor (with MILCs), or in the case of Zeiss and Leica ultra wide angle M lenses, “redshift”. The former two problems can be solved by directly fixing the lens rear or camera body, but “redshift” proves to be a much more complicated problem. Let us examine what exactly redshift is first:

The so-called redshift appears like this, as can be seen in the picture above, a purplish-red gradient sort of bleeds into the borders of the photo, sometimes even lowering the brightness, causing a “vignette”.

The first thing you need to know: Redshift is a special phenomenon that only occurs on digital cameras, generally speaking, film cameras are free from this problem.

Additionally, redshift generally only happens when using lenses with a very short back focal length. Examples, where this phenomenon will occur when paired with a digital mirrorless camera, include ultra wide angle lenses with the Zeiss Biogon structure, the Schneider Super Angulon structure with a Leica M mount and lenses from the Contax G series. The reason redshift occur is because the short back focal length will cause the angle of the light that shines through the edge of the lens onto the image sensor to be too large, causing chromatic aberration when the final image is rendered, at the same time, problems such as lens vignette or deterioration in quality may also occur.

Redshift will often also occur when mounting an ultra wide angle lens with a short flange focal distance onto a MILC, or at the very least, problems such as lens vignette or loss of quality will occur. The Sony A7R full frame camera is one such where these issues are prominent. There are three methods that allow one to use a vintage ultra wide angle lens with a MILC:

1. Choose a camera with an APS sensor or something smaller, avoid the area where redshift may occur by cutting down the sensor size;

2. Deal with the problem using the App that comes with new Sony MILC cameras;

3. The most straightforward and effective method is to avoid using ultra wide angle lens with a short flange focal distance, ultra wide angle lenses with a longer flange focal distance such as those by Nikon or in the Leica R series do not have the problem of redshift.

The reason only digital cameras will have the problem of redshift is that its image sensor (ex. CMOS) is much thicker than that of films, therefore it will be closer to the rear end of the lens compared to films, causing problems such as severe redshift, lens vignette and loss of image quality. All three problems aside from the loss of image quality (deterioration of image quality around the edge of the photo) can be solved easily through some editing in image editing software such as Lightroom. Below I will teach you how to fix redshift, lens vignetting and other problems such as wide angle distortion, the methods are very simple.

Note 1: Ultra wide angle lenses notorious for the problem of severe redshift include the Leica Super Angulon M lens, the Zeiss Biogon M/G lenses and the Voigtlander Color-Skopar etc. If redshift is a problem you mind, try avoiding these lenses.

Note 2: Due to the limitation posed by the structure of cameras (such as the reflex mirror), lenses with the same structure could have different back focal length designs due to the mounting flange (Flange Focal Distance) being different. For example, the Super Angulon Leica R lenses have a longer back focal length compared to Leica M lenses, so when interchanged using a MILC, the problem of redshift can be prevented.

Ultra wide angle distortion, redshift and lens vignetting fix (using Lightroom for example)

On the adjustment panels on the right in Lightroom, there is a “Lens Corrections” option on the bottom that allows you to perform lens correction for specific lenses to tackle problems such as wide angle distortion (the edges appearing curved) or lens vignetting (the corner and edges appearing darker). If you are using modern lenses, Lightroom will automatically select the appropriate lens profile according to the lens model recorded in the metadata of your photos. All you will need to do is check “enable profile corrections” and confirm if Lightroom selected the correct lens model for you.

If you’re using an old lens, or if your lens doesn’t allow the camera to automatically record its information which makes Lightroom unable to automatically select a lens profile for you, you can also manually select a focal length and lens model is most similar to your lens and let Lightroom handle the rest of the profile for you. After that, you can adjust the value for “distortion” (solving wide angle distortion) and “vignette” (solving lens vignetting) yourself, adjusting the photo to your desired result.

However, not even lens correction can fix the problem of redshift (it can, however, deal with purple fringing, which I will address in a later date), and its ability to correct lens vignetting is also limited. Therefore if you are using vintage lenses, only the issue of distortion out of the three problems (redshift, vignette, distortion) can be solved through lens correction. Please read on as I address the other two problems.

Since the redshift and vignette caused by the same lens on the same camera are usually rendered in an inverted oval shape and diffusing outwards, we can deal with the problem of redshift using the radial filter tool. First click on the radial filter on the top right corner, then drags a large oval mask over your photo so that the edge of the mask touches right around where the redshift begins on the edges of the photo. You do not have to get the shape right on your first try, you can adjust the size and shape of your mask afterward using transformation tools.

Once you’ve created your shape, check the “invert mask” option circled in the image above on the right, this way, we can adjust the radial filter in the affected area. Make sure that you check this box, or else you will end up adjusting the values of the area circled by the mask, and not the surrounding edge affected by redshift!

After adjusting the shape of the mask and inverting it, we can use the options “Temp” and “Tint” to fix the redshift problem. Dragging the setting for the tint to the right can fix the redshift while tweaking the temp value after adjusting the tint can help you rebalance the color temperature of the photo. By using the two values to edit the purplish-red color out of the photo, we can use the “exposure” adjustment to deal with the vignette. If the edges of the photo start to blur or lower in contrast, you could also try and fix it by adjusting the values for sharpness and contrast.

Generally speaking, this method can allow you to solve the problem of chromatic aberration or loss in brightness caused by redshift or lens vignetting, but after all, it is done through image processing software, so some damage in the image quality cannot be prevented. But if you just have to use lenses that will cause this kind of problems no matter what, then this is the only way you can go about solving them! Unless you choose to shoot in “B&W”, redshift or quality damage after processing cannot be prevented. As for image quality deterioration… since the image quality itself is damaged, there is no way you can salvage it, so you’ll just have to give it up.

After fixing the redshift problem, we can track back to our normal habits and edit the whole photo! If during the process of editing, you find that the redshift is still not dealt with nicely enough, you could always go back and use the radial filter to further make adjustments to it. As I mentioned before, the area of redshift caused by the same lens on the same camera is usually the same, therefore after you’ve edited one photo, you could use function that allows you to “apply the same setting onto all the other photos” and use the mask you’ve made to fix the redshift of all the pictures at once, saving you time from adjusting them one by one. (Different programs have different ways of applying this, go search for it yourself online)

You can see in the above image the final result after the adjustments! Although there is still a hint of purple and red around the sides, it can be dealt with through some more detailed color adjustments. If you really mind that, then find an image where the problem is the most severe, and slowly adjust it from there before applying that setting onto the rest of the photos!


If you are interested in our articles, you can also LIKE our page:)