
What I’ll be showing you today is the easiest and most basic example of image editing. In the future, I will also be using examples to demonstrate different shooting techniques and editing methods, and I hope that everyone will be able to learn something to apply to their own photos!
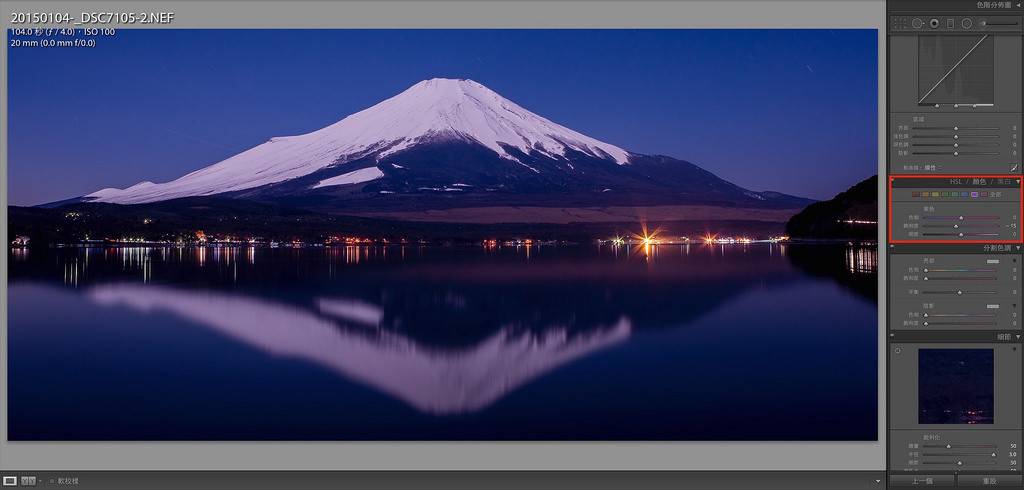
This photo is the result of me standing in the cold, at night, beside a mountain lake shooting with a tripod and a shutter release. It is a long exposure photo with an exposure time of 104 seconds.
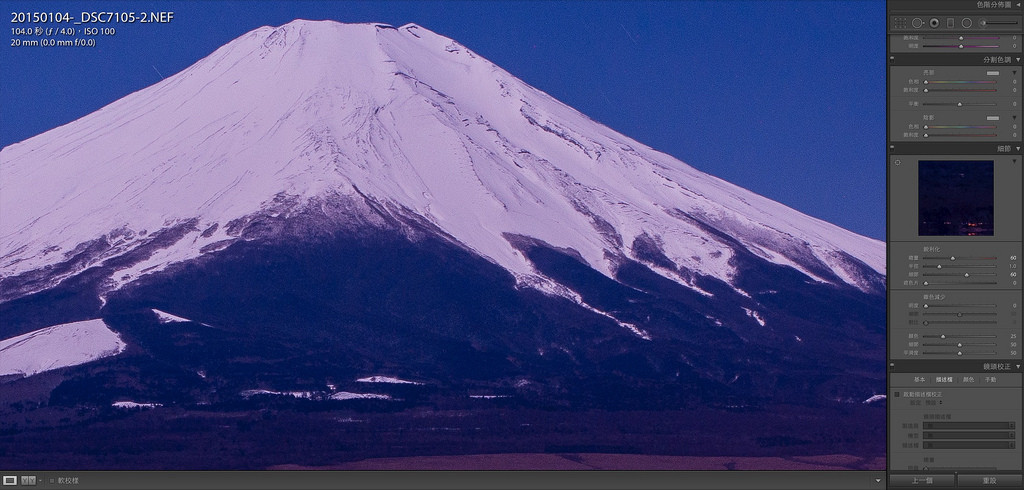
However, the wind that night was actually quite strong, therefore in order to prevent the waves on the lake from destroying the reflection of Mt. Fuji, the exposure time could not be extended anymore in order to get a photo with adequate exposure. Therefore the actual RAW file of what I shot actually looks like this, as shown below:

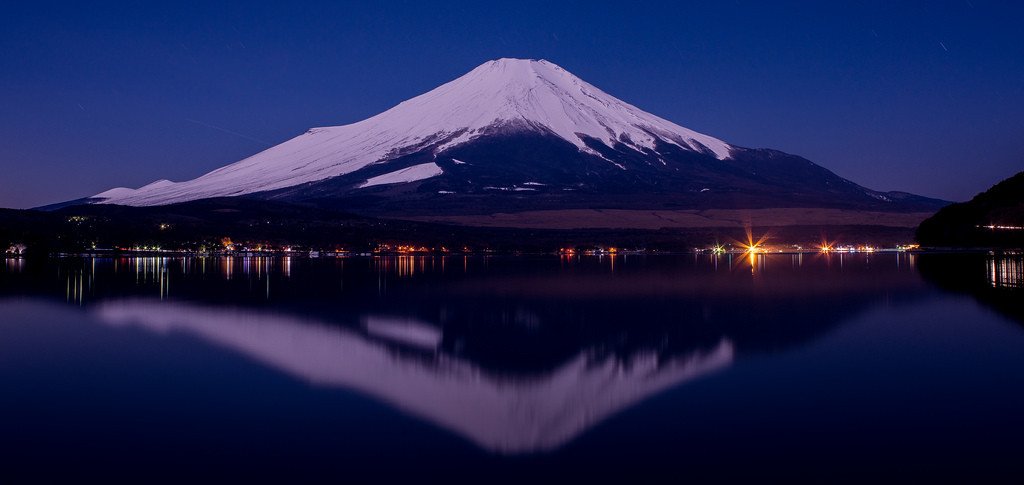
You must be thinking: That is way too big of a difference! Indeed, as I have mentioned in another photography lesson a while back, if you shoot in the RAW format with a DSLR, you get the maximum amount of editing potential afterwards. Even though the above picture was exposed for 104 seconds, it is still impossible to get a shot of the lightless Fuji mountain that is “bright enough” under ISO100. Even the colour contrast looks rather flat and two dimensional without any processing. In the following section, I will be editing this photo following the steps that I usually take, with the final result being the cover photo you just saw.
1. Adjust the exposure

Before editing begins, I always make sure I adjust the exposure of the image so the brightness reaches a level where it is “clearly visible to the naked eye”. Because whether it is the contrast or colour that you are adjusting, we won’t be able to assess clearly what we are editing when the photo is not bright enough. Therefore making sure that the photo is made to be “bright enough” is a must.
Generally speaking, I will make the photo just a little bit brighter than the brightness that “looks bright enough” (usually it’s around +0.5~1EV), this is because when we’re going to adjust the contrast, highlights or shadows later it’ll usually make the photo a bit darker. So I what I usually do is to adjust the photo so that it is slightly overexposed, to begin with, this way, I won’t have to come back and re-adjust it later.
2. Adjust contrast, highlights & shadows, clarity, vibrancy

After adjusting the exposure, you will find that the photo will become flat and dull, this is because Lightroom increases a photo’s overall brightness evenly, which makes the already two dimensional photo look “even flatter”, this problem can be corrected by adjusting the values in the red box indicated in the above image.
First let us adjust the levels of the highlights and shadows, generally speaking, I start by dragging it towards negative values. However every picture will have a different combination of values, so refer to your own work when trying this out. The image will look more layered and three dimensional after adjusting the highlights and shadows, but this is not enough!

RAW files only record the data of an image and do not apply any additional edits to it, the colours of these files are therefore generally duller and less sharp. This is where we will be using the clarity, vibrancy and saturation tool to enhance a photo’s vibrancy and sharpness. Here it is also recommended to tweak the values of these three settings based on your own photo. For portraits, I generally think that a clarity of +5 is enough and can prevent the human face from looking too rigid, but anything other than portraits I’d adjust the setting to at least +20. Beware, however, if you increase the clarity by too much the contrast will also become too high, so adjust the values accordingly and don’t set extreme values. As for the vibrancy and saturation, try it out yourself and adjust according to your colouring needs!
3. Crop the photo, correct the horizon
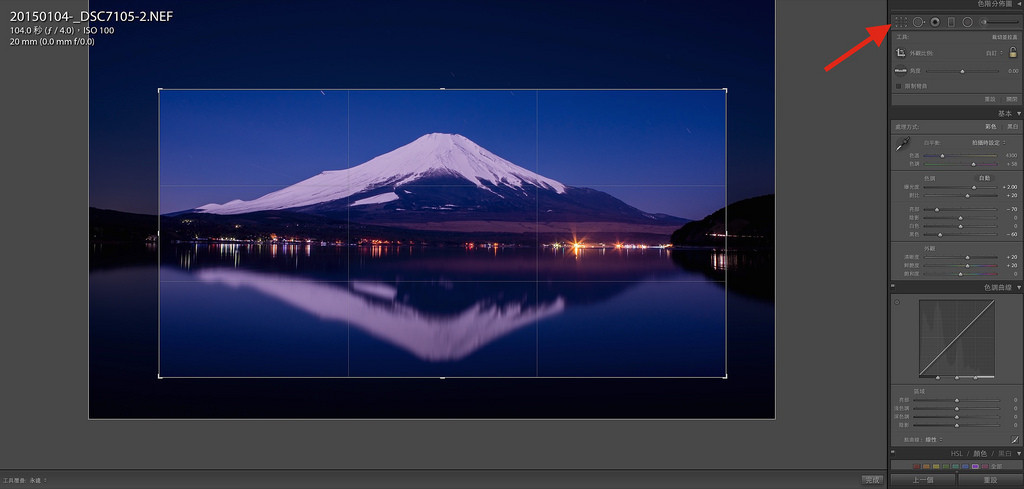
As there used to be a certain set of ratios when printing photos in the past, we will usually shrink or zoom our photos to specific sizes (such as 4X6, 5X7). But since we all look at pictures on computers or phones now, if you think your picture would look better if it is “long and thin” then go ahead and crop it the way you like! It is your work, don’t mind so much what other people think, the most important thing is that you like it!
As for this photo, since it was shot from the beginning with a 20mm ultra wide angle lens. A large portion of the frame will be occupied by the sky and ground with a lot of random noise in it, I am therefore only interested in keeping the part with the mountain and its reflection. So I crop the photo until it has a flatter ratio, and not only does it look good, it also makes it suitable for printing longer posters.
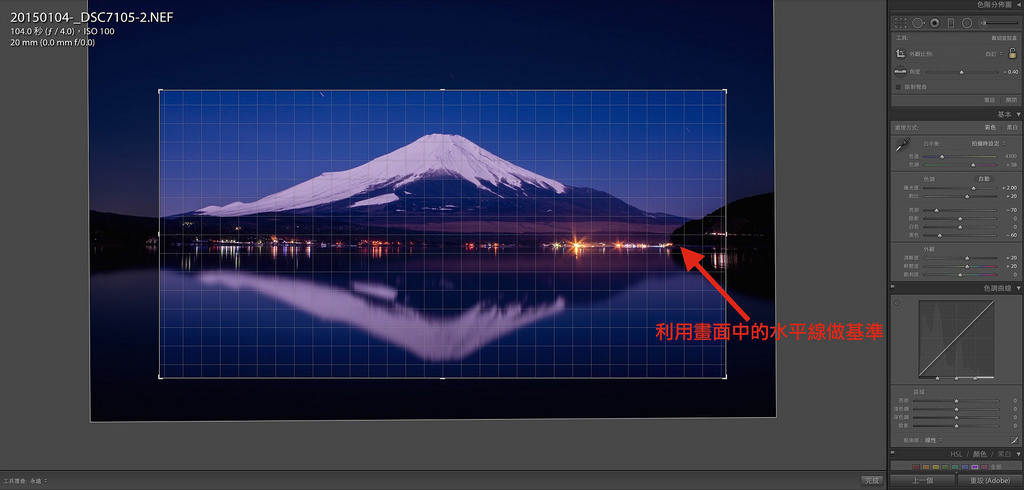
You must remember to correct the horizon!
You must remember to correct the horizon!
You must remember to correct the horizon!
Important things should be repeated three times. You might not have captured a perfect horizon while shooting with your hands or with a tripod, and that is not so much of an issue. The problem is that many people don’t even bother to correct the horizon afterwards when they shoot scenery photos, and this really does make people uncomfortable!! I, therefore, make sure to correct the horizon of every photo I take to prevent “making myself uncomfortable”. It is easy to correct the horizon as well, just move the cursor to the corner where it turns into a rotation tool when you’re using the cropping tool. While you’re rotating the image guidelines will appear for your reference, and all you have to do is adjust the photo so the horizontal and vertical items in the shot are matched up with the guidelines.
The example above uses the lake as the reference point for adjustment, making it very easy to correct the horizon.
4. Use the gradient filter to make adjustments, emphasise the photo’s theme
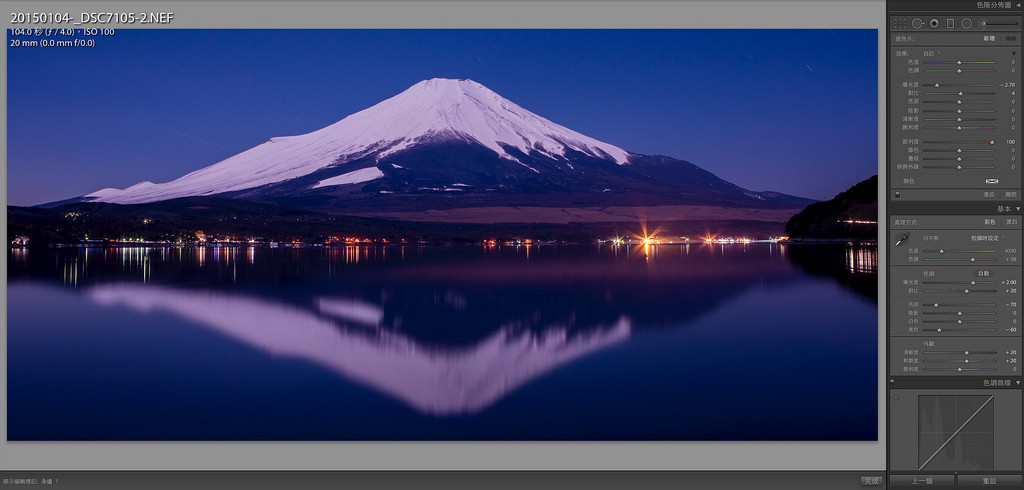
As this photo was taken during a full moon, the Fuji mountain itself and its reflection are of a similar brightness. But since our theme today is the mountain, its reflection is really only there to serve as a contrast. If the reflection is too bright it will make the mountain stand out less, therefore we must make slight adjustments to the reflection in order to emphasise our main theme.

And we’ll be using the gradient filter to adjust the brightness of the reflection! I drag the filter from bottom to top, and slightly lower the brightness of the reflection of the mountain so that there is a larger contrast between the mountain and its reflection, pushing the main subject Mt. Fuji to the front. Furthermore, due to a part of the reflection being blurry, we can also use the gradient filter to increase the clarity of the reflection (clarity +100), this way the shape of the reflection can be emphasised.
As for why we should use the gradient filter to decrease the brightness of the reflection and not increase the brightness of the mountain? This is because if you overly rely on Lightroom’s brightness tool to increase the brightness of a photo, it pretty much does the same thing as when you increase the ISO value in the beginning. Both results in a lot of noise on the photo, decreasing its overall quality and appeal. Therefore I usually directly use the gradient filter to decrease the brightness and increase contrast after determining the photo’s overall brightness, this is more or less a compensation that is made to prevent noise.
5. Adjust sharpness, make Mt. Fuji look more clear
After adjusting the light and shadows, we can go ahead and work on making the photo more sharp and clear! Since RAW files don’t get sharpened automatically by the camera, the resulting photos usually look a little more blurry. In this case, we can use the “detail” panel below and edit the photo so it becomes sharper, this way your photo will be able to look like a poster or scenery shots in magazines! This step is very important, as it is the vital step in determining whether your photo is “sharp” and processed properly. However when you try to adjust this setting from the start you could easily misjudge the value of the sharpness due to issues with highlights and shadows, I therefore usually save this step for last.
6. Adjust the hue, colour temperature and make corrections to specific colours
Generally speaking after making a bunch of adjustments to a photo, its colour will start straying towards a “weird” direction. For instance, this photo after going through the above-demonstrated adjustments, it went from being a “blue” photo (Mt. Fuji at night is blue) to be a purplish redone. This is when we will be using hue, colour temperature and local colour correction to correct the colour of an image. Or else you’ll be left with having to upload a purplish-red image of the Mt. Fuji with a caption saying that it is shot during the night. Although it is not wrong, this would be considered more of an artistic rendering rather than a realistic one. So adjust the values according to your personal preferences!
Now we’re all done!

This concludes the post-processing work of this image of Mt. Fuji at night. Don’t you think when compared to the original version this newly edited one looks a lot more dreamy? I know that many people think “editing” strips away the merits of photography, and I will ask them this: do you still call it photography then, if you use a specific brand of camera to capture a specific soft skin tone on people?
We can easily capture images with colours catered to our needs by selecting specific camera brands and utilising the characteristics of its lenses. Although during the age of film back then we could also select films and particular lenses in order to obtain a “specific” colour performance, speaking of post-processing, layering and such still would require you to rely on darkroom editing. Back then, we don’t have cameras that directly produce JPGs (aside from polaroids). Therefore personally, I always shoot in RAW when I take pictures, whether it is for travelling or self-portraits. I do use both Nikon and Sony cameras at the same time after all, so if I rely only on the cameras to do the work, then not only will the resulting colours on my photos not fit my need, there might also be visible differences between results from the different cameras. Why then would I rely on the cameras themselves to render my images?
If after you’ve read this article you still don’t catch the differences between each step of my edit demo, then there may be two possibilities: One is that your monitor is of low quality can can’t distinguish between detailed colour differences; the second is that you may be less sensitive to colours yourself, something which can be improved through training.
If you are interested in our articles, you can also LIKE our page:)
Want to see more related articles? CLICK ME to enter the Chinese version website