How to solve the problem of redshift during post-processing.

“Those with more experience in photography must have had experiences with using vintage lenses on a new DSLR with an interchangeable lens mount. Plenty of old-fashioned lenses are able to produce unique and tasteful photos, however, there are bound to be some issues when pairing old lenses with new cameras. This article addresses the Flange focal distance and redshift, in hopes to provide aid to those who are exploring interchangeable lenses.”

Back focal length is a very important value when it comes to designing lenses, it, however, has a different effect than the Flange focal distance on cameras with interchangeable lenses, therefore the ways to deal with the problems are also drastically different. This article will explain to everyone the difference between the Flange focal distance and back focal length, in addition to solving the “redshift” problem caused by ultra wide angle lenses with short back focal lengths using LightRoom. If you have encountered similar problems, I advise you to read this article carefully.


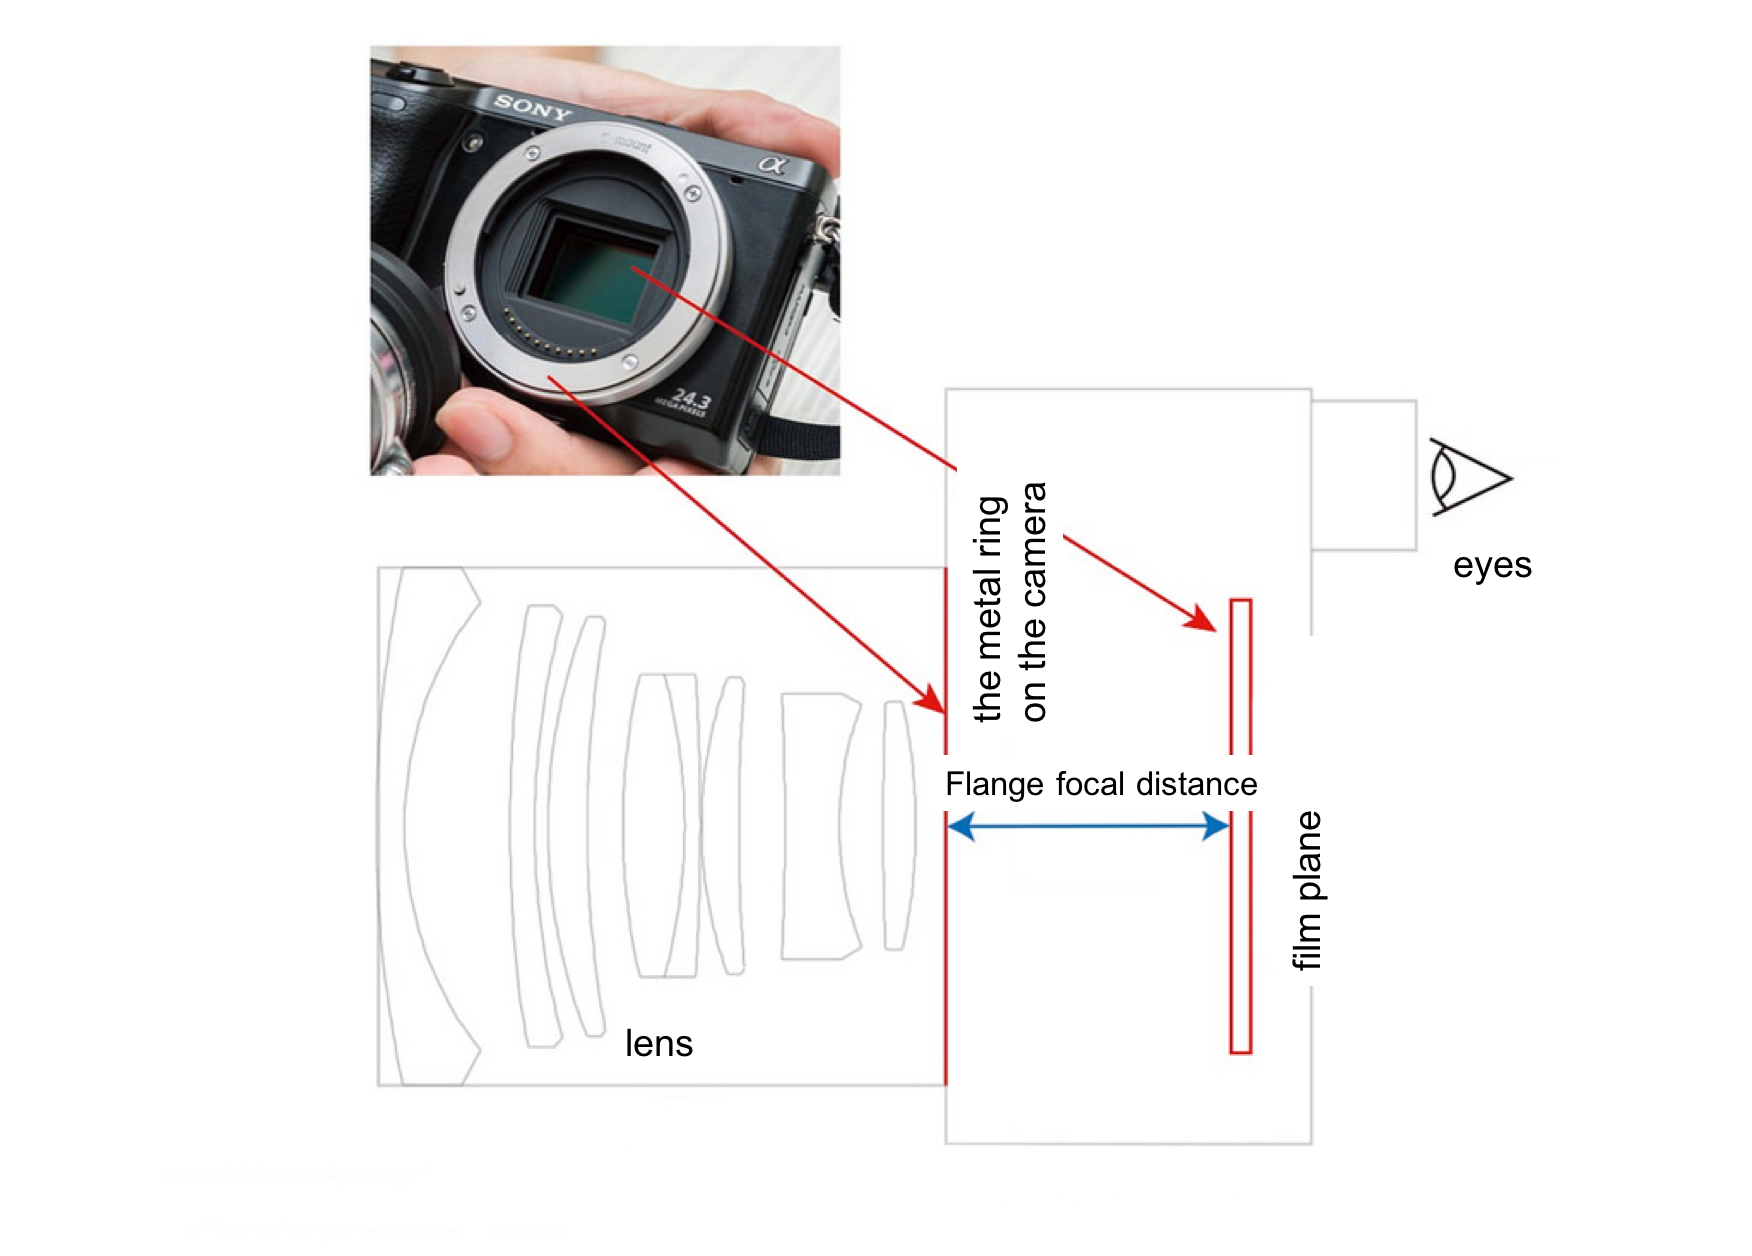
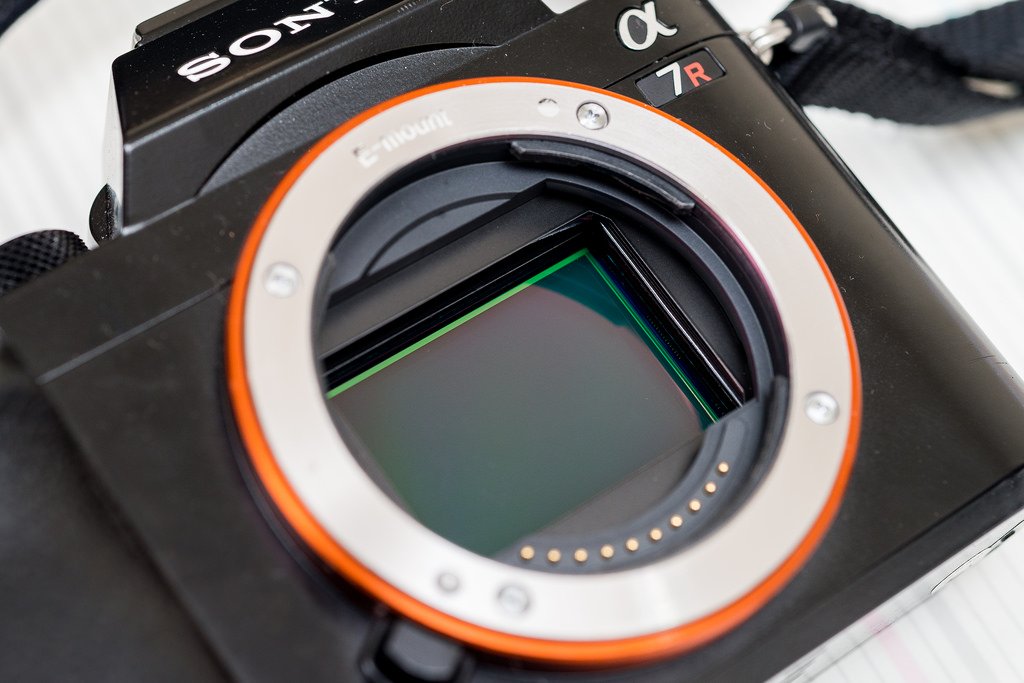
The so-called FaLan distance refers to the distance between the mounting flange of a lens and its image sensor/film plane, the proper English term is Flange focal distance, “FaLan” being the transliteration of Flange. The Flange focal distance can only be found on cameras or video cameras that “can change lenses” because this value must be taken into account when pairing and focusing lenses from different series. Why do cameras with a non-changeable lens not have a Flange focal distance you ask? Well, since it does not have a mounting flange, of course, it won’t have a Flange focal distance either.

For lenses with different Flange focal distances, we could use lens mounts and adapters to extend the length of the Flange focal distance when mounting the lens on different cameras. Then what about the back focal length?

If we’re only talking about the design of lenses itself, without considering how it will be mounted on cameras, then to those studying optical design, only the so-called “Back Focal Length” will really matter. Back focal length refers to the distance between the last piece of the optical lens in a camera lens and its image sensor/film plane and is an important value in the design of optical paths in lenses. Even for lenses with the same Flange focal distance, the design of the back focal length will still differ depending on the structure of the lens, please see the image below:

Both lenses in the image above are compatible with the Leica M mount, therefore they both have the same Flange focal distance (can be used with cameras from the Leica M series). But you can clearly see that the 28mm lens on the left has a whole extra section protruding from it compared to the 35mm lens on the right (there’s a lens inside), this is what it means by “having the same Flange focal distance doesn’t necessarily mean the back focal length will also be the same”. The lens on the left has a shorter back focal length, therefore the last piece of the lens will protrude from the mount. Go give a look at your own lenses, it’s the same logic when you see some lenses where its rear protrudes from the mount, while others don’t.

The reflex mirror of some SLRs may collide with the rear lens of some lenses when interchanging due to the back focal length of the lenses being too short, this is usually called “collision”. To address this issue, most camera body manufacturers will provide the correct Flange focal distance and the maximum distance that “won’t result in collision” to the lens designing factories, so that they can avoid this problem when designing their lenses. However, in the case of mounting products from different factories (ex. Leica R lens to Nikon SLR), the solution will have to be to alter the reflex mirror or the length of the lens rear.

All that being said, as long as the Flange focal distance is correct, basically any lens can be mounted onto any camera (leaving the sensor size out of the picture for now) and function normally. But if the lens in question is special(generally speaking it will be the case of ultra wide angle lenses, since the back focal length of these lenses are usually shorter), there may be problems such as collision with the reflex mirror (in the case with SLRs), collision with the image sensor (with MILCs), or in the case of Zeiss and Leica ultra wide angle M lenses, “redshift”. The former two problems can be solved by directly fixing the lens rear or camera body, but “redshift” proves to be a much more complicated problem. Let us examine what exactly redshift is first:

The so-called redshift appears like this, as can be seen in the picture above, a purplish-red gradient sort of bleeds into the borders of the photo, sometimes even lowering the brightness, causing a “vignette”.

The first thing you need to know: Redshift is a special phenomenon that only occurs on digital cameras, generally speaking, film cameras are free from this problem.

Additionally, redshift generally only happens when using lenses with a very short back focal length. Examples, where this phenomenon will occur when paired with a digital mirrorless camera, include ultra wide angle lenses with the Zeiss Biogon structure, the Schneider Super Angulon structure with a Leica M mount and lenses from the Contax G series. The reason redshift occur is because the short back focal length will cause the angle of the light that shines through the edge of the lens onto the image sensor to be too large, causing chromatic aberration when the final image is rendered, at the same time, problems such as lens vignette or deterioration in quality may also occur.

Redshift will often also occur when mounting an ultra wide angle lens with a short flange focal distance onto a MILC, or at the very least, problems such as lens vignette or loss of quality will occur. The Sony A7R full frame camera is one such where these issues are prominent. There are three methods that allow one to use a vintage ultra wide angle lens with a MILC:

1. Choose a camera with an APS sensor or something smaller, avoid the area where redshift may occur by cutting down the sensor size;

2. Deal with the problem using the App that comes with new Sony MILC cameras;

3. The most straightforward and effective method is to avoid using ultra wide angle lens with a short flange focal distance, ultra wide angle lenses with a longer flange focal distance such as those by Nikon or in the Leica R series do not have the problem of redshift.

The reason only digital cameras will have the problem of redshift is that its image sensor (ex. CMOS) is much thicker than that of films, therefore it will be closer to the rear end of the lens compared to films, causing problems such as severe redshift, lens vignette and loss of image quality. All three problems aside from the loss of image quality (deterioration of image quality around the edge of the photo) can be solved easily through some editing in image editing software such as Lightroom. Below I will teach you how to fix redshift, lens vignetting and other problems such as wide angle distortion, the methods are very simple.

Note 1: Ultra wide angle lenses notorious for the problem of severe redshift include the Leica Super Angulon M lens, the Zeiss Biogon M/G lenses and the Voigtlander Color-Skopar etc. If redshift is a problem you mind, try avoiding these lenses.

Note 2: Due to the limitation posed by the structure of cameras (such as the reflex mirror), lenses with the same structure could have different back focal length designs due to the mounting flange (Flange Focal Distance) being different. For example, the Super Angulon Leica R lenses have a longer back focal length compared to Leica M lenses, so when interchanged using a MILC, the problem of redshift can be prevented.

Ultra wide angle distortion, redshift and lens vignetting fix (using Lightroom for example)

On the adjustment panels on the right in Lightroom, there is a “Lens Corrections” option on the bottom that allows you to perform lens correction for specific lenses to tackle problems such as wide angle distortion (the edges appearing curved) or lens vignetting (the corner and edges appearing darker). If you are using modern lenses, Lightroom will automatically select the appropriate lens profile according to the lens model recorded in the metadata of your photos. All you will need to do is check “enable profile corrections” and confirm if Lightroom selected the correct lens model for you.

If you’re using an old lens, or if your lens doesn’t allow the camera to automatically record its information which makes Lightroom unable to automatically select a lens profile for you, you can also manually select a focal length and lens model is most similar to your lens and let Lightroom handle the rest of the profile for you. After that, you can adjust the value for “distortion” (solving wide angle distortion) and “vignette” (solving lens vignetting) yourself, adjusting the photo to your desired result.

However, not even lens correction can fix the problem of redshift (it can, however, deal with purple fringing, which I will address in a later date), and its ability to correct lens vignetting is also limited. Therefore if you are using vintage lenses, only the issue of distortion out of the three problems (redshift, vignette, distortion) can be solved through lens correction. Please read on as I address the other two problems.

Since the redshift and vignette caused by the same lens on the same camera are usually rendered in an inverted oval shape and diffusing outwards, we can deal with the problem of redshift using the radial filter tool. First click on the radial filter on the top right corner, then drags a large oval mask over your photo so that the edge of the mask touches right around where the redshift begins on the edges of the photo. You do not have to get the shape right on your first try, you can adjust the size and shape of your mask afterward using transformation tools.

Once you’ve created your shape, check the “invert mask” option circled in the image above on the right, this way, we can adjust the radial filter in the affected area. Make sure that you check this box, or else you will end up adjusting the values of the area circled by the mask, and not the surrounding edge affected by redshift!

After adjusting the shape of the mask and inverting it, we can use the options “Temp” and “Tint” to fix the redshift problem. Dragging the setting for the tint to the right can fix the redshift while tweaking the temp value after adjusting the tint can help you rebalance the color temperature of the photo. By using the two values to edit the purplish-red color out of the photo, we can use the “exposure” adjustment to deal with the vignette. If the edges of the photo start to blur or lower in contrast, you could also try and fix it by adjusting the values for sharpness and contrast.

Generally speaking, this method can allow you to solve the problem of chromatic aberration or loss in brightness caused by redshift or lens vignetting, but after all, it is done through image processing software, so some damage in the image quality cannot be prevented. But if you just have to use lenses that will cause this kind of problems no matter what, then this is the only way you can go about solving them! Unless you choose to shoot in “B&W”, redshift or quality damage after processing cannot be prevented. As for image quality deterioration… since the image quality itself is damaged, there is no way you can salvage it, so you’ll just have to give it up.

After fixing the redshift problem, we can track back to our normal habits and edit the whole photo! If during the process of editing, you find that the redshift is still not dealt with nicely enough, you could always go back and use the radial filter to further make adjustments to it. As I mentioned before, the area of redshift caused by the same lens on the same camera is usually the same, therefore after you’ve edited one photo, you could use function that allows you to “apply the same setting onto all the other photos” and use the mask you’ve made to fix the redshift of all the pictures at once, saving you time from adjusting them one by one. (Different programs have different ways of applying this, go search for it yourself online)

You can see in the above image the final result after the adjustments! Although there is still a hint of purple and red around the sides, it can be dealt with through some more detailed color adjustments. If you really mind that, then find an image where the problem is the most severe, and slowly adjust it from there before applying that setting onto the rest of the photos!


If you are interested in our articles, you can also LIKE our page:)

Understanding interchangeable lens through the flange focal distance

“All experienced photographers that play with lenses know, sometimes the use of a vintage lens can allow you to capture many effects that simply cannot be achieved through digital lenses. And why is that modern DSLRs are made compatible with old manual lenses? Or lenses from other major manufacturers? This article is here to introduce everyone to the concept of ‘flange focal distance and interchangeable lens’, assisting beginners in picking up their games.”

Have you ever heard of the term “interchangeable lens”? Our general understanding is that Canon should be paired with Canon, and Nikon with Nikon. Although there are aftermarket brands such as Sigma and Tamron that produce lenses for the major brands, we still have to specifically purchase lens models that are “For Canon” or “For Nikon”. Even the unstoppable German brand Zeiss has to add labels such as ZE(Canon) or ZF(Nikon) to their lens to differentiate between the different mounting mechanisms. But did you know? As long as a certain set of requirements are met, lenses from different brands can actually be used interchangeably, such as Sony using Leica lenses, Nikon using Leica lenses etc.


And these “certain set of requirements” is the important value in photography that we will be discussing today: Flange focal distance.

Why aren’t lenses for each camera interchangeable?


There are two main reasons as to why lenses are made to be used by specific brands: the lens mount and the flange focal distance are different. In the above you can see a Leica M lens mount on the left, and a Nikon SLR F lens mount on the right. The two are evidently different in their latches, diameter and mechanisms, as is their overall structure. So obviously you can’t just attach the Leica lens onto your Nikon camera, the same goes for the other way around.

However, for those who have done some research, an object called “interchangeable mount” can allow you to mount lenses from different brands onto different cameras. But is that really the case?

 As mentioned earlier, there is another important factor to consider when deciding whether or not lenses can be interchangeable, and that is the “flange focal distance”. The so-called flange focal distance is the distance from the mounting flange(the metal ring on the camera) to the film plane, as illustrated in the image above. Each major manufacturer have a different value for their camera systems, some are relatively short like Sony and Canon, while some are longer such as Nikon and Leica R. The flange focal distance decides whether or not your lens will be able to render an image clearly in focus on film, as an incorrect distance could result in an inability to focus on infinity, inability to focus at all or inability to render a photo in its entirety(resulting in dark edges around your photo).


The image above shows the Sony A7R, mirrorless cameras such as this one does not require a reflex mirror, therefore its mounting flange is made to be very close to the film plane, meaning that it has a “extremely short flange focal distance”.


The above is a Nikon single-lens reflex camera with a reflex mirror, as you can see, the flange focal distance after the reflex mirror is lifted(the purple part is the film plane, and you can only see it after lifting the reflex mirror) is far larger than that of the Sony A7R. As of now, Nikon’s F-mount has the longest flange focal distance out of all mainstream single-lens reflex and mirrorless cameras, which also means it is difficult for Nikon cameras to interchange with lenses from other brands. On the other hand, Sony’s mirrorless E-mount has the shortest flange focal distance, making it possible for it to use nearly every lens on the market. Doesn’t that sound miraculous? The principle is actually very simple:


On the left of the image above you can see a Leica M lens mounted onto the interchangeable lens mount of a Sony E-mount(Sony mirrorless, including APS-C and full-frame cameras), while on the right you can see a Nikon F lens(Nikon DSLR) mounted onto the interchangeable lens mount of a Sony E-mount. Both include mounting a lens from a different brand onto an interchangeable lens mount for a Sony mirrorless camera, but the thickness of them differ drastically, can you identify the inkling?


Indeed, a lens mount not only changes the mounting flange of your Nikon lens into that of a Sony lens, it also has another vital function: to simulate the necessary flange focal distance of the designated camera brand. As you can see in the previous image, the distance required by a Nikon lens is larger than that of a Sony mirrorless camera, therefore when a Nikon lens is to be mounted on a Sony camera with an extremely short flange focal distance, the lens mount will need to compensate for the necessary distance by “simulating” it. The easiest way to do that is to thicken the lens mount so that the rear of a lens is mounted further away from the camera body.


Due to this reason, Nikon and Sony can be said to be the most extreme example of interchanging lenses. As Nikon has the longest flange focal distance, aside from Leica R who has a similar distance, lenses from other brands such as Canon and Contax can’t be used through the average lens mount; while Sony with its short flange distance can use nearly every lens on the market when paired with a suitable lens mount that increases the flange distance.

This is also why you can often see people online playfully calling Sony mirrorless cameras “Beigang XX”(Google it yourself), although such is a degrading and discriminatory term, it does emphasize the fact that Sony mirrorless cameras can use almost every lens.


Leica lenses have excellent performance and very high image quality, such that even some of their lenses produced just after world war 2 out-performs certain front-running modern day products. However, as the price tag for a Leica M camera body starts at two hundred thousand NT, not everyone can afford them (Leica lenses, however, can be bought at around ten thousand, which is a lot more affordable). Due to that reason, after the release of the Sony A7 full-frame mirrorless camera that can accommodate Leica lenses without it has to sacrifice its wide-angle focal length for APS-C sensor sizes(basically every other Sony mirrorless besides the A7 series), the A7 promptly became a must-have for numerous Leica users, who also called the product “Leica lens unleashing” cameras as it has an even better image quality and specs than an OEM Leica camera.


Note: Why does APS-C have to sacrifice wide-angle? Please see 【What you need to know before purchasing a camera: an introduction to sensor size, focal length and aperture. 】


There is another advantage to interchangeable lenses. They can save you a lot of money purchasing lenses.

Plenty of vintage lenses are much cheaper than the new lenses that are coming out, examples include Nikon’s ultra-wide angle lens and their macro lens. Even Leica has some models that are far cheaper than modern day Sony’s new Zeiss lenses, and they even have better performances. This is when interchanging with vintage lenses can not only save you money but also give you higher quality results.


However, something you should take note of is that most lenses require manual focusing once you’ve attached them to an interchangeable mount. Although companies such as Canon and Contax G have released auto-focus mount adapters specifically for Sony products, the product’s accuracy and efficiency can only be described as “unfortunate”, so you can forget about them.

After mounting an interchangeable lens, manual focusing is required, but how should be approached that?

For an SLR, there would be a light indicator for focusing, additionally, some lens mount would have chips on them and will notify you when the lens are in focus. It is all relatively easy to use, I may demonstrate that in the future when a chance arises. As for the mirrorless camera above, there are usually two options when it comes to focusing, one being “focus peaking” and the other being “magnify focus”, as can be seen in the two images below:

Focus Peaking

Can you see the yellow dots in the picture above? (On the fonts on the lenses) This is the peak focus displayed by the camera when it detects edges of high contrast on the objects based on the threshold setting. To put it simply, areas in focus will have colorful dots over them as an indication to you. Some cameras display the peak focus in red or other colors (Sony allows you to pick it for yourself), one can say that this is the fastest and easiest way of manual focusing with a mirrorless camera.

However, for scenes with a lower contrast or a dark environment, problems such as “unable to display peak focus” or “inaccurate focus peaking” will arise, as the function is not an all-rounded one. But if you wish for speed and efficiency, then focus peaking is the optimal solution. That being said, not every brand of mirrorless cameras include this function, so make sure to do your research and see if your mirrorless camera can use focus peaking before you buy it, or else it’d be ridiculous when it doesn’t work.


Magnify focus

Magnify focus works as its name suggests, it allows you to “manually focus” while looking into a magnified scene. This method is useful for those who specialize in still life photography, or those who are quick on their hands, and can ensure that their shot is “most definitely sharp and in focus”. Personally speaking, this focusing method is even more reliable than the camera’s auto-focus function. After all, slip-ups may still occur with the system during automatic functions, but directly magnifying the scene and manually adjusting the focus can ensure that nothing goes wrong. Unless there’s a problem with your eyesight, magnify focus is definitely the safest way for shooting still life photography!

Note: If you think what was described above is troublesome and inconvenient for traveling use, I recommend you consult this method: 【 Understand the DOF scales and hyperfocal distance, manual focus will be made simple.】

After reading the above introduction, you must have gained a better understanding of interchangeable lenses right? By principle, as long as the flange focal distance is correct, and a mount is purchased, you will be able to freely use all kinds of different lenses! Some lenses can be directly interchanged as they have the same flange focal distance, examples include the Leica R lens in the above photo (the one on the top right) which can be directly used by a Nikon SLR just by changing the ring mount, which is super convenient. Nearly every photo you see on Cool3C taken by me is shot using this lens, the image quality is spectacular.


There are actually plenty of devices available for interchanging lenses. You need only look up your camera and lens brand online to find the matching lens mount you will need!


Ultra important definitions that you must read up on if you want to avoid making a fool of yourself:


The “FaLan distance” mentioned in this article is a transliteration of the English word Flange, the full term being “Flange focal distance”, referring to the distance from the “image sensor/film plane” to the mounting flange of the camera lens. It is not exactly considered an “academic” term in the study of optics but is instead just a term used by camera manufacturers for the design of camera lens mounts. This term could be easily confused with another term “Back focal length”, so do pay special attention. The mainstream translation of Back focal length in Taiwan translates to “Lens-back distance”, referring to the distance between the optical lens of the camera lens and the image sensor/film plane.

There are essentially no connections between back focal length and all the other terms in question such as the flange focal distance, mirrorless cameras, and SLRs, as it is a term directly related to the optical design of the lens itself. For instance, Zeiss’ Biogon and the series of Leica M super Angulon ultra-wide angle lenses have the problem of redshift (red shadows appearing on the edge of photos) when paired with digital cameras due to its short back focal length; Leica R’s special version Leica R Super Angulon has to alter its reflex mirror due to its short back focal length causing its reflex mirror to collide with the rear of the lens. The flange focal distance of these lenses, however, do not have any problems and can be mounted on compatible cameras and used normally, it’s just the problem with the back focal length that causes issues when shooting.


These two values get mixed up too often, so I think it’s best that I explain them. Why had I noticed this tendency? Because when this article was shared to a certain FaceBook group, I got yelled at by a senior in this field (self-proclaimed to have more than thirty years of experience with vintage lenses, someone who’s been using vintage lenses before they’re even considered vintage) with a background in optical physics, accusing me of the misuse of English translations despite being a PhD student, and even further questions my academic integrity. In the end, it was them who mixed up the terms flange focal distance and back focal length, and they thought that I had invented the saying “FaLan distance” to refer to back focal length…


So friends, the FaLan distance (Flange focal distance) and Lens-back distance (Back focal length) are completely different things! Do not mix them up. The former determines whether your lens can work and focus properly with a certain camera; while the latter affects whether or not your lens can render an image normally (the redshift mentioned previously is not a normal occurrence) or properly function at all (colliding with the reflex mirror is not normal). Both values are relevant and important to interchangeable lenses but are two completely separate concepts. Do make sure to understand them clearly before venturing into the world of vintage lenses!


If you are interested in our articles, you can also LIKE our page:)