High specification but low-priced handphone, Xiaomi Pocophone F1!


“Xiaomi has presented the first new handphone of Pocophone, a brand new sub-brand with super sincerity, super competitive and ultra-luxury specifications! The new handphone is equipped with qualcomm Snapdragon 845 processor, having a 6GB or 8GB memory, and a 64GB or 256GB storage capacity. With such excellent performance, it does not cost you exceed RM 2,000?!”


Xiaomi announced the first product of its new sub-brand Pocophone in India earlier, and decided to use the Pocophone F1 as its name. It is expected to be the cheapest mobile phone with the Qualcomm Snapdragon 845 processor in the mobile market.

According to Jai Mani’s words, the Chief Product Officer of Xiaomi, Pocophone hopes to reverse the scenario of the high-quality flagship handset always comes with a sharply high price and the sufficient in technical innovation. This time Pocophone F1 has the main objected of providing high performance while meeting practical needs and a low price to the customers.

In terms of hardware specifications, the Pocophone F1 uses Qualcomm Snapdragon 845 processor, 6GB or 8GB memory, and 64GB or 256GB storage capacity specifications, and supports expansion through micro SD memory card, and also configures 4000mAh battery capacity like Samsung Galaxy Note 9. The built-in cooling system also uses the capillary-cooled liquid cooling design to make the mobile phone processor operate more stable and can maintain a higher performance.

The size of the fuselage is 6.18-inch Full HD+ resolution LCD screen, 18.7:9 display ratio and “bang” style screen, video camera uses 20 million pixels, and the main camera has 12 million pixels +500 The megapixel specification is a dual lens configuration that corresponds to the f/1.9 aperture design.

Although it is not as light and thin as the Samsung mobile phone product, it will not be excessively heavy also. Even the current glass back cover design is not adopted, the choice of plastic material design can enhance the non-slip and drop-resistant characteristics of the mobile phone, unlike the front and rear glass design mobile phone products often have to match the mobile phone protective case to have a slip-proof effect. Relatively, the thickness of the fuselage will increase.

The exterior parts are designed in the form of general matte and card materials, and the colours include black, blue, red and card design.

The recommended price of the Pocophone F1 was set to be sold at a price of Rs 20,999, which means the price is less than RM 2,000. It might be the cheapest Snapdragon 845 processor phone available.

Pocophone F1 is expected to sell in India and Europe first. From the perspective of the product launch will also be held in Hong Kong, there may be opportunities to reveal in the Malaysian market. However, will it be possible to enter the US market is still an unknown question.

If you are interested in our articles, you can also LIKE our page:)

Want to see more related articles? CLICK ME to enter the Chinese version website.

Make those bold edits! And witness the miraculous God rays


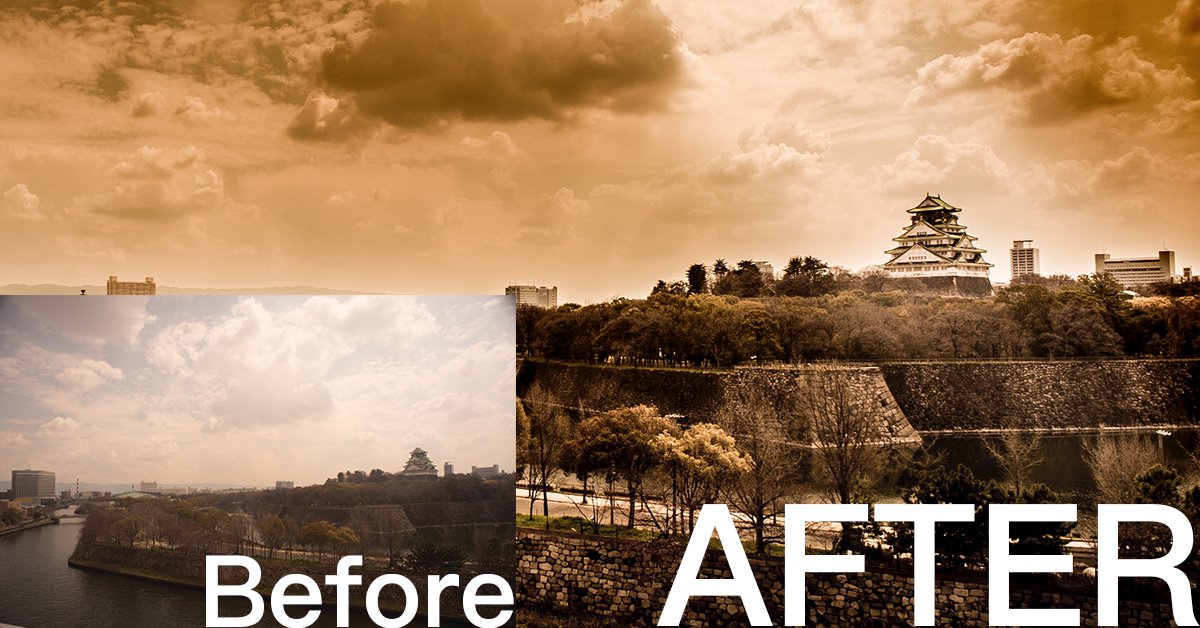
“Lightroom truly is an amazing editing tool that can turn something completely unremarkable into a piece of gem. A lot of unsuccessful photos can be easily brought back to life just by applying a few filters. This article will teach everyone how to use the gradient filter function to turn an ordinary photo into one that is unique and stunning.”


Sometimes we’d finally get the chance to travel abroad, but due to various reasons such as temporary misjudgment, a lack of skill, poor lighting or a shortage of time… we end up with a series of boring and uninspiring photos. But your friends insist on you showing them your travel photos, so what should you do? Previously I’ve discussed a photo shot in Sweden, where I’ve edited it from a dark, backlit photo into a vacation photo masterpiece. Though that picture was, after all, based off what was realistically present. Today, we are going to be fierce, and come up with an edit that is “oh wow dope”, how can we approach that?

At times like this, adding some fancy god rays may be a good idea!

What are god rays?

The so-called god rays are rays of light that radiate from the sky onto your subject, but please don’t mistake it with “a ray of light that shines from the top of your head into the sky”. God rays always come down from the sky, not the other way around, so when we create the effect, it has to come from the sky. But I still must remind you, god rays are not necessary to fake effects for photos, as long as there are some clouds in the sky, any gaps that result in between the clouds will have god rays shooting out from it.

So god rays are actually rather commonplace, just hard to capture on camera. But we have Lightroom! So what can’t we do?

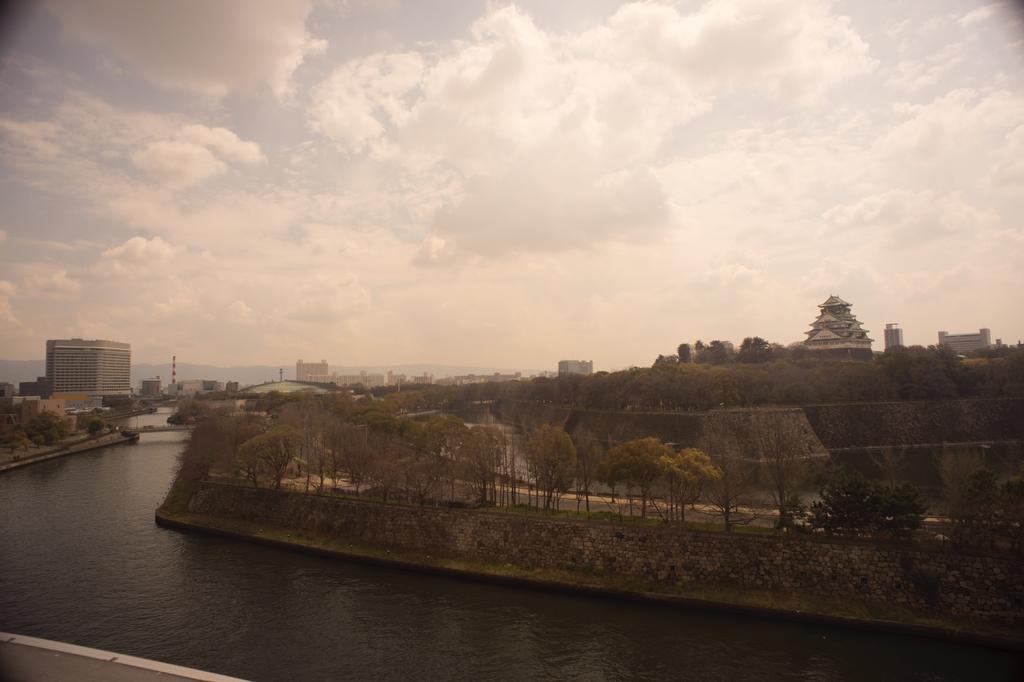
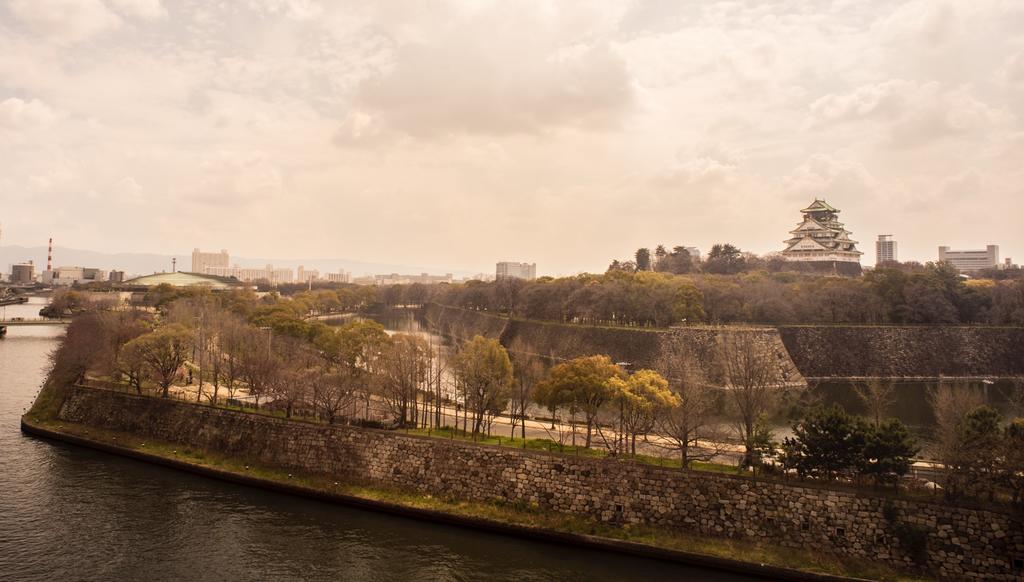
First, let’s look at this picture!

Honestly, I don’t even know why there is such a lame photo in my Lightroom library… this photo is even worse than what I would shoot with an iPhone, not to mention that the colours are weird, the sky is foggy, with severe vignetting also present. A photo like this is not very convincing for your case when telling people that you’ve been to Osaka. So we must give this picture a nice polish!

First let’s crop out everything that doesn’t belong there, such as the vignette and the buildings near the edge, and slightly adjust the composition. I’ve left the Osaka castle small here so that when the god rays shine in its presence will be emphasised, it is, therefore, unnecessary for it to be enlarged.

Next, we’ll fix the highlights and shadows, we’ll be using the defogging method here: decrease the highlights and the shadows. Although Lightroom also has a built-in function to get rid of the fog in photos, I’m still used to manual adjustment. I therefore directly increase the exposure of the image and decrease the value of the highlights and shadows, that way, the problem of fogginess can be solved. Additionally, another defogging method is used here: increasing the clarity, allowing the photo to look more sharp and clear.

Another reminder here that clarity and sharpness are not related. If you want to increase the details of a photo, so that the scene looks sharp, please make adjustments to the sharpness instead of clarity.

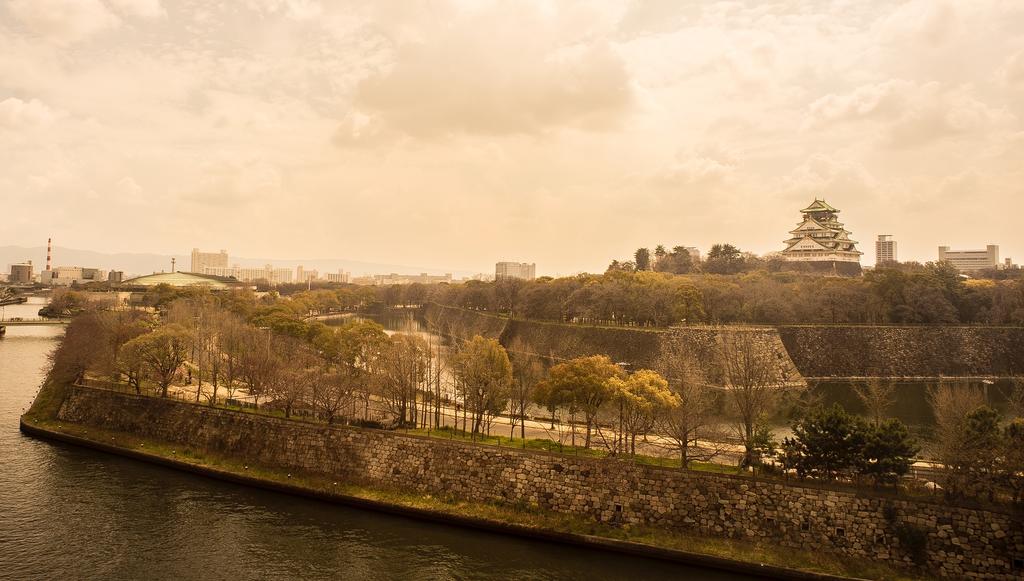
As the colour of the photo is already lame, plus I’m not sure if something got stuck that day, the colours of the photo just cannot be tweaked to look normal. Therefore, I might as well edit the photo to an old and sepia tone, I’m already trying to add an unrealistic god ray anyway, why not just edit the photo into the style of a disaster film.

Now comes the focus of today, the god rays! Most online tutorials teach people how to create them in Photoshop, but we don’t need it to be so complicated here. Since the only subject that will be given a spotlight today with the rays is the Osaka castle, we only have to use gradient filters. First drag a filter from the bottom left corner to the top, placing the front edge of the filter to the left side of the fake ray, and trace out the line of the ray.

Then decrease the area covered by the filter, lower the highlights and increase the clarity to make the photo looks more dramatic.

After the left side is complete, all that is left is the right! Drag a gradient filter from the top right, and trace the line of the ray.

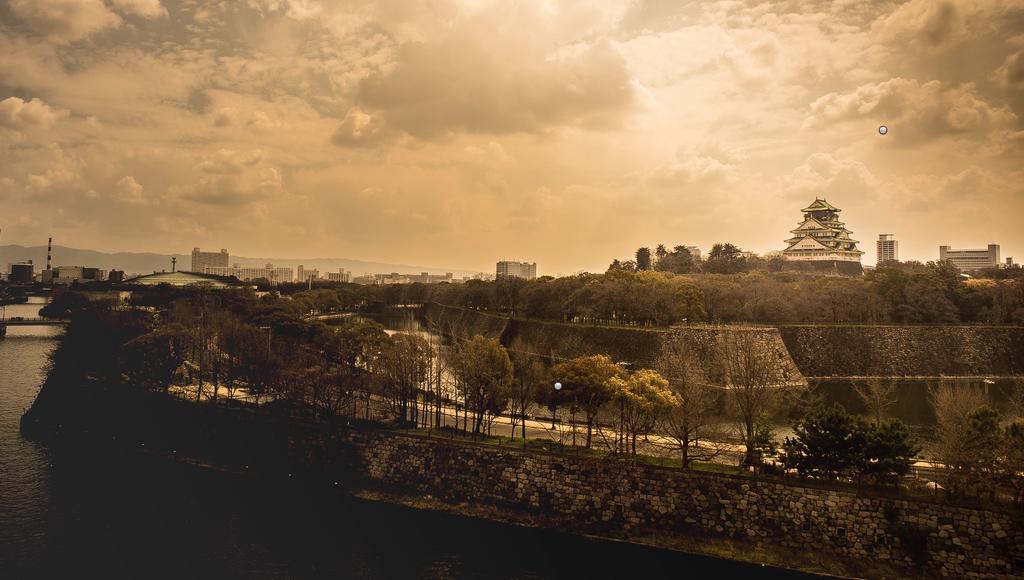
Do the same thing and lower the exposure, highlights while increasing the clarity of the filter, so that the clouds on the right half becomes equally dramatic. And now you can see a decent looking god ray shining upon the Osaka Castle! Take special note of the origins of the light here, since god rays usually come through gaps in the cloud, your ray has to radiate from in between the clouds. You can’t have the origin of the light set on a cloud, it will look very awkward as if there is a glowing cloud in the sky.

Therefore in the case of this photo, I have the light shine through the edge of the extra large piece of cloud, so that there is a feeling of the ray breaking through the sky.

Lastly, adjust the contrast and clarity of the whole photo as well as making detailed modifications to the brightness, position and linear qualities of the god ray. And you too can create a dashing, movie poster like the photo!

If you are interested in our articles, you can also LIKE our page:)

Want to see more related articles? CLICK ME to enter the Chinese version website.

Failed again? Four photo taking tips to calm your girlfriend down


“Whether you’re taking pictures for other people, or for your own girlfriend, the biggest risk is to end up with pictures with big faces, short legs, bad lighting or anything else that is unnatural and disdainful. This article will share four tips on taking pictures of people, including shooting angles and shooting poses, so that everyone can avoid the awkward picture fails in the future.”


The reason for this column’s existence must be explained before the article begins. Due to the prevalence of K-drama in the past few years, the concept of the “sweet guy” became a rather popular one. Feel free to consult Google on how the “sweet guy” is defined, but basically, in addition to having attractive appearance girls find comfortable, the sweet guy also has to perform caring and considerate deeds on every turn. For instance being an attentive listener, let the girl walk on the inside of the road and taking the initiative to hold her hand… nearly every girl wishes to be under the protection of a gentle and caring “Oppa”.

But… (the keyword But has appeared!) To be blunt, there are not so many sweet guys in the world alright? If you’re a girl, then you’d want to sooner wake up. If you’re a guy, don’t despair despite not having a handsome face. Get a grasp on a few principles, use your heart to decipher the thoughts of girls and what troubles their mind, appropriately showcase thoughtful acts and you will also be upgraded from an accessory to a sweet guy!

We will first approach this on the basis that every girl under the sky likes to take pictures with their phones, not only do they like to take selfies with their phones, it is even better if there’s a “sweet guy” readily available that is willing to be the photographer for them. But if his picture taking skills are lacking, then he’ll immediately fall short of being a sweet guy and be degraded to perhaps a creep. And the worst is that there may not be another chance in the future, so what would you say of the importance of picture taking skills? Especially in the present where smartphone cameras are becoming more and more advanced, for today’s example, we will be using the HTC 10, that has a well-acclaimed camera, most assuredly, taking proper photos is definitely no complicated task. Grasp these useful tips listed below, and you too will be able to take some “gorgeous” shots for her!

Properly utilise high angles, capture slender and graceful proportions of modelling standards

▲ For girls of shorter heights, it is generally desirable to capture perfect proportions through specific photography techniques. Usually shooting from a high angle from top above is a reliable method, not only can it capture a slender proportion but also a smaller, prettier face, in addition to being able to capture the overall dress sense of the shot subject

▲ As a side note, shooting from a low angle can also capture the slimming effect, but beware of the fact that gathers around the neck and chin! Besides… this picture taking pose really does tread the line between being a sweet guy and a creep, so do practice it a few times before you try it out XD


160 to 170! Everyone can be a hot chick with beautiful legs

▲ Having a pair of enviable alluring long legs must be the wish of every pretty girl in the world. And a few pictures taking tips will turn that into reality! First of all, no matter if she’s standing or sitting, remember that she is to keep her legs closed and slightly crossed. The legs will definitely look longer compared to when kept apart.

▲ As for the guy framing the picture, stick to the principle of keeping the feet around the bottom of the frame. To put it simply, try to frame the girl’s feet around the bottom edge of the photo and leave around half the space empty above her head, the visual illusion will make her legs look slightly elongated. And as an additional note, if your phone itself has a built-in wide-angle mode, the leg-stretching effect will look even better!

Grasp the natural, fleeting moments and immediately capture the elegant, literate style

▲ Girls are born to love picture taking, whether they’re walking, dining or even going to the toilet they need to take pictures. But what if you can’t think of anything to shoot, what should you do then? Let’s go the natural route! She doesn’t necessarily have to look into the camera, she can just grab a few small things from beside her and pose naturally using that, the photographer can then go ahead and capture all kinds of her natural looks!

▲ What if she still can’t open up? Then try chatting with her during shooting, or play the jester and make her laugh. In short, try to loosen the presence of the camera, and don’t forget to use the burst mode, you may just capture some right shots!


Scared of the face is too dark? Try using the HDR mode!

▲ The most important thing in photography is lighting, as long as there is enough light, even a low-resolution camera can produce decent pictures. But if you must take pictures in a low light environment, then you’ll have to rely on the HDR mode! What HDR does is that it take burst photos under the same environment and layer all the photos together in order to balance the brightness, so you won’t have to worry about taking dark-faced photos in dimmed light environments anymore!

▲The principle behind HDR is not actually important, just remember that enabling the HDR mode will greatly improve the photo’s effect if the surrounding lighting is not enough. However, sometimes if the lighting is uneven, the face will still end up being shadowed poorly. Therefore it is still recommended to take pictures in brighter environments.

Conclusion


Aside from the above-listed tips, it is also important for the camera of the phone to meet a certain standard. Especially when today’s phones easily have about ten million pixels above, with some even advertising large aperture and anti-shake mechanisms… functions that are of professional DSLR standards. The HTC 10 used in this article, for example, has functions such as the built-in panning function and optical anti-shake systems that are enough to ensure the quality of photos. In addition to that, the phone also supports wide angle shots, which can further enhance the leg-lengthening effect when taking portraits, which are all helpful in taking pretty pictures that girls will like!

If you are interested in our articles, you can also LIKE our page:)

Want to see more related articles? CLICK ME to enter the Chinese version website.

Here comes the masterlist for photography posing! Learn all at once how you can shoot modeling photos


“If you’re someone that like to have pictures ‘taken of’, or someone that likes to do portrait photography, then you must not miss this pose masterlist. This article organises a few tips used by professional models during photoshoots, and summarises six main points for everyone’s convenience.”


No one wants to see themselves looking dorky and bulgy in photos, but unfortunately, most people have no idea what to do in front of a camera. Below I have organised tips that will immediately allow you to improve on such “awkward scenarios” as soon as you understand them. Spare some five minutes, and say goodbye forever to ugly pictures!

1. Get used to cameras

In this day and age where everyone has a camera on hand, it’s no longer possible to say stuff such as “I don’t want to be in the pictures” or “I am not used to taking pictures”.


  • Point 1. Conquering your fear of cameras is something that need only be done once in a lifetime. Once you’ve overcome it, you will never be afraid again. In an era where everyone has a camera, this is a must.
  • Point 2. The key to overcoming the fear of cameras and making a breakthrough is: find “the face (the most attractive angle/expression)” for you when taking pictures of yourself through mirrors or selfies and use that same face for every other picture you will be taking from now on
  • Point 3. If your smile is unattractive, then don’t smile in pictures. No one said you have to show your gum when taking pictures, just do whatever that makes you happy
  • Point 4. Don’t clench your jaw because of anxiety! Jaw clenching will make your face look shorter and rounder
  • Point 5. If your hair covers too much of your face, you can try using an appropriate amount of hair to “shrink your face”, though covering too much of your face will make the picture look funny
  • Point 6. Try placing your hand beside your face if you feel too nervous, and imagine it is your hands everybody is looking at, then say goodbye to nervousness! (Though if your hands look like a fish cake, it probably will make you feel even more nervous than before)
  • Point 7. Go to your happy place when taking pictures, the details of your face will be altered just so slightly that you will look better in pictures

2. Try out different side angles

Taking pictures without turning to your side even a little bit will make you look “intense and vigorous” when shooting from up front, it will only leave two kinds of impressions: very dense or very angry.

Side angles include “twisting the whole body (with the shoulders as reference)” and “twisting just the head”. These are generally completely separated topics during discussions. However most of the time, side angles means turning around 45 degrees, simple.

Below is a list of examples of the suitable head angles for different subjects after assuming a side angle of 45 degrees clockwise. The head angle is set at 0 when the front of the face is in line with the front of the shoulders.

Female soft and beautiful: head turned 0 degrees

Female individualistic and enigmatic: head turned 15 degrees, chin slightly raised

Female confident: head turned 45 degrees counter-clockwise

Male confident: head turned 60 degrees counter-clockwise, chin slightly lowered

An additional note is that usually, a raised head will emit tension and aggression, while a lowered head will give a softer and easier feeling.


3. A person that doesn’t know where to place their hands will never take a good picture.

Models often only care about whether their face is beautiful or not, but a thing that is actually more important is the placement of the hands.


  • Point 1. The most difficult part is that you must understand where “the hands” need to be placed. Practice, face the mirror and practice, find your hand placement first, this way you won’t be at a loss when facing your photographer
  • Point 2. Hand poses can completely change the effect of a photo, whether you want a soft and gentle effect or a strong and fashionable look, the hand placements must be met with special attention. Even if you think a pose may feel “unnatural”, it may often be in spite of that the “most natural look in the final photo”.
  • Point 3. Modelling photos where the model looks relaxed are often shot while the model is exerting a lot of effort. Aside from rehearsing beforehand, you must check with your photographer on the scene and decide whether or not your poses are suitable

4. Kashiwagi Yuki’s posing phrase: “rock, paper, scissors”

The rock, paper, scissors hand poses phrase provides a solution to the challenge of not being able to think of hand poses. It’s more effective to show than tell, please look at the demonstration video by Kashiwagi Yuki shown below!

5. Full body shots tip: Place the centre of gravity on one leg, and control the other leg to change the mood

After preparing the face and hands as mentioned previously, what is left of the full body shot is just the bottom half of the body.

“Leg poses” are peculiar, there isn’t much to be said about it, but it can’t be just glossed over. Combinations include a mix of touching or separating the knees and touching or separating the ankles, for example:

Ankles touching + knees together gives a sweet and delicate feeling.


Feet pointing outwards + knees separated exudes a sense of confidence.

6. Everyone should have a signature Big Pose

If you want to capture the feeling of a fashion magazine in your shots, memorise the following two Big Poses and save them as your ultimate moves!

Most people are probably not familiar with those and cannot really handle a Big Pose, especially when shooting outside, it must be rather embarrassing. But the effect of Big Poses are truly amazing, so you must try them out when you’ve got the chance!

If you are interested in our articles, you can also LIKE our page:)


Want to see more related articles? CLICK ME to enter the Chinese version website.

Unable to appear photogenic? Small changes in angles will allow you to look good in photos too.


“We all know that there are special skills in positioning products for commercial photography, so of course there are also optimal poses for models during portrait photography. Not only can a good pose refine your proportions, it can also make you look more confident. This article shares the six poses suggestions for portrait photography by Jodee Ball, a photographer from Ohio, providing everyone with a guide to practice posing in front of a mirror, in order to produce better photos in the future.”


Do you also want to shoot beautiful photos? As long as you get the angles right, everything else will come naturally. American photographer Jodee Ball from Ohio gave six suggestions regarding posing, let’s explore the secrets of angles together!

1. Find a pose where you can be the most relaxed

2. Twist your body so that it can be divided into three parts in the shot

3. Be aware of the poses of your hands

4. Lower your shoulders

5. Bend your knees

6. Slightly tilt your head

From the above six tips, it is obvious that it’s better for posing if your body is more relaxed and slightly tilted instead of being stiff and tense. These may also be helpful tips for selfie-taking, so those who are interested can feel free to attempt at them.

 If you are interested in our articles, you can also LIKE our page:)


Want to see more related articles? CLICK ME to enter the Chinese version website.

The huge difference between left and right, is photography composition important?


“We hear of the golden ratio, the rule of thirds, but are these seemingly professional methods of composition actually essential to a photographer? Today we will leave these composition rules aside, and look at how characters and objects should be placed in order to achieve the look and feel you desire in your photos.”


The general consensus is that composition is something that has to be done right all at once during the photoshoot, however, unless the photo shoot is done in a studio, it is rather difficult to get the composition all settled at once while shooting. There will often be all sorts of reasons that will result in the need to crop the image afterwards during editing to reframe the composition. But how should we approach composition exactly? Many tutorials will speak of the golden ratio, the rule of thirds and complicated things such as perspective composition.


But what exactly would be considered a good composition? I, personally, think that all these rules of composition as nothing more than smoke and mirrors. I think that above anything else, images that can “get its point across to the viewers” are to be considered the best kind of compositions.


There are no definitive formulas to photography composition, as there will be all sorts of suitable compositions depending on the different theme and settings of your shots. When I mentioned previously that all these rules are smoke and mirrors, it’s because the real reasons that decide whether a picture looks good or immersive or not should be explored through “cognitive psychology”. Human eyes are prone to trickery, if there is even one hint in an image that can trigger a person’s imagination, that picture can be said to be a “heartfelt” one.

A lot of “professionals” would tell you not to put your subject right in the middle of the frame, because it doesn’t look good. But is that really the case?

It is discovered through cognitive psychology experiments, that test subjects actually mostly prefer compositions where the main subject of the scene is placed right in the middle of a photo. And when the subject is facing the edge of the frame, as in when the dog is facing the left and framed on the left side of the photo (or vice versa), test subjects tend to like it less compared to compositions where the subject is framed in the middle of the shot.

You will find that, after observing the results of these experiments, the elements that actually affect people’s preference of a photo actually has little to do with the rule of thirds or the golden ratio and such. What really attracts people are the imagery formed by the poses and positions of the main subject in the frame. We’ll do a little experiment with the image below:

I have placed Saber right in the middle of this picture, and thanks to the high resolution of the D800E, I am able to crop the image and place her either on the right or the left of the frame without the image becoming too low quality to be used. This Saber figurine also happens to not be looking into the camera, so we can do an experiment here similar to that of the one with the dog.

I crop the image of Saber into the two versions displayed above, one where she’s one third to the left, and the other where she’s one third to the right. Don’t you think these two pictures give out very different vibes? Now let’s add some words to the pictures to further demonstrate the differences these two pictures’ radiates.

When Saber gazes at the middle of the image, the shot will emanate a sense of deep yearning and longing, with the words “how I miss him” is just appropriate.

But what if it’s the other way around? All in a sudden, Saber’s gaze became a crestfallen, dispirited one, much befitting of the words “let’s break up”.

The two images are cropped from the same photo, but because of the different framing of the subject, the direction of the gaze gives the two pictures completely different feelings, appearing from longing to separation within the snap of a finger. So what do you say? Is cropping for composition important? Of course, it is! Because different compositions can completely alter the way an image will be perceived by its audiences.

But are the so-called composition rules important at all?

Look at this image above, where the person is placed right in the middle of the frame, do you find it to be unappealing, uncomfortable and unlikeable?

I would not assume so. No one is going to think twice about the rules when there’s a pretty girl to see. Who cares about composition? Human eyes are easily deceived, so instead of thinking about how to “composite” your images so it follows the rules, you should rather ask yourself this: does the way you crop your photo actually allow it to convey what you want?

If you are interested in our articles, you can also LIKE our page:)

Want to see more related articles? CLICK ME to enter the Chinese version website.

Can’t have the best of both worlds? Lesson on how to shoot clear night + portrait photography!


“Those who love travelling and photography are bound to find that there are many specific attractions where its full glamour can only be captured when the sun is down and lights are lit. But how should we take care of the background in the darkness and the sparkling neon lights at the same time? What about the person that is to be included in the shot? This article will be focusing on nighttime portraits, using a complete example to demonstrate and provide explanations.”


There must be plenty of night views or views with neon lights and such that you’d what to photograph during your travels. Although night photography can be done rather simply by setting a longer exposure time when using a DSLR, if you want to include a person in the shot… that would require some skill.

The attraction this time is the Gundam statue in the “DiverCity Tokyo Plaza” in Japan, this 1:1 Gundam model that looks better at night (because of the lights) is not that difficult to shoot on its own, but proves to be much harder when you want to include a person in the shot. So this will be our example today.

Why is it difficult to include a person in the shot?


Because the Gundam square is a very very dark and small park, aside from the Gundam itself that is bright, everything around it is as dark as it gets. Therefore if you adjust the exposure setting according to how you could capture the Gundam clearly, the person in the photo you get will come out dark like this.

But what if you extend the exposure time to brighten up the person? Then the Gundam will be overexposed!


Therefore night photography with a brighter background like this can prove to be quite challenging, but as long as you have an on-top camera flash, the problem will be easy to solve! If you are using series such as the Sony A7R or Canon 5D that does not have an equipped flash… then remember to bring a mini speedlight in your bag with you. That way you can have it by your side whenever you need to use it outside.

The example image is shot using a 35mm lens, the camera placement will be brought up in the end, it’s placed in a spot that can shoot the person from waist up + taking in the entire Gundam statue.


The image above is used to explain the “aperture problem”, I have the aperture set at f22 for this photoshoot, because if the aperture is any larger than this, then while the focus in on me, the Gundam behind will be dropped out of the depth of field and become blurry, therefore shrinking the aperture is a must!


Note: Regarding the depth of field problem, please see:【Understand the DOF scales and hyperfocal distance, manual focus will be made simple.

Don’t need to care too much about the brightness of the person in the screen (because the person relies on the speedlight to fill in the brightness)


Since the aperture is set on a very small value, the shutter time will need to be extended. Take for example this shot, when I have the setting on f22, the ISO needs to be adjusted to 1600 in order for the shutter speed to be less than a second. If your camera can’t meter or focus properly in settings such as this Gundam square, then go straight for the LiveView mode to get a preview!

As for the flash, I directly adjusted the setting of the on-top camera flash to M mode. This is because if I let the camera use its TTL setting, the Gundam’s brightness itself will often affect the camera’s judgment, causing the flash to not deliver a correct output. Due to the dark location, small aperture and the low built-in output of the on-top camera flash, I chose to directly set the flash to full output for this shot, you can go try it for yourself.

Note: For speedlight settings please see: 【Dedicated to new photography fans, three key methods for the operation of Speedlights

After finalising the setting and focus, you can snap a photo of yourself with the self-timer mode! The above image is the result of using the on-top camera flash, although the skin colour isn’t rendered nicely due to the direct flash, compared to the shots where the person’s either too dark or the background is overexposed, a travel photo like this can already be considered quite decent. At least you got a clear shot together with Gundam.

Furthermore, don’t worry about the long exposure time (the image above was one second) causing the portrait to become blurred. Since the location is dark, the on-top camera flash will already be able to produce a “frame freezing” effect, therefore unless your exposure time is even longer than that (over one second), and you can’t stop yourself from moving, then just the flash alone would be able to freeze your image for you. When metering, just focus on the Gundam, don’t worry about the lighting of the portion of the portrait.

As for where you should place your camera? Remember the beam of light in the picture above, just place your camera on that spot and use a 35mm lens, you will be able to get the waist up portrait + the whole Gundam in one shot like in the example. Just remember to decrease the aperture size, unless you want a blurry Gundam in your final picture.

If you are interested in our articles, you can also LIKE our page:)


Want to see more related articles? CLICK ME to enter the Chinese version website.