
Previously, the six key points in purchasing a Speedlight is introduced, let us move on today to address the three key points in actually using one!
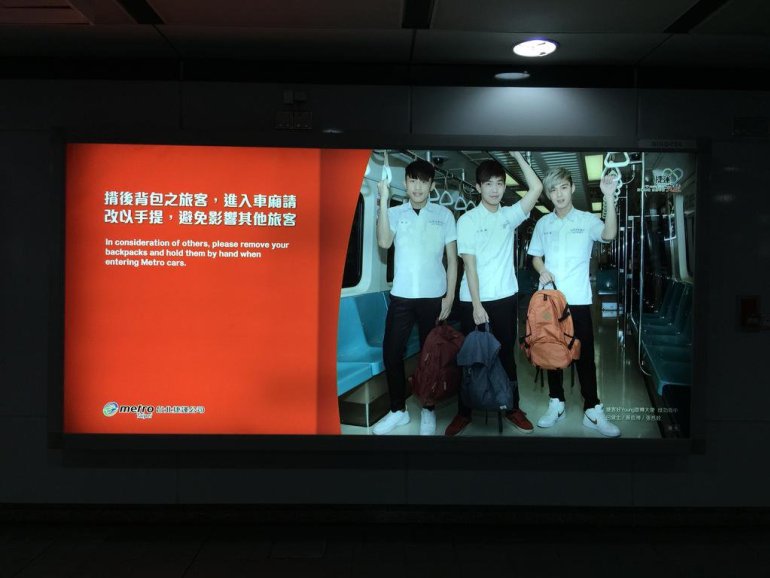
It’s not difficult at all to operate a Speedlight, unfortunately,y it is quite common these days to spot “casuals” who thinks that holding an SLR automatically makes them a photographer. They don’t tend to put much care into the most basics of photography principles, and instead blindly pursues unnecessary professional equipment to show off. The results are often ludicrous, case in point the recent series of student advertisements by the metro company(see image after the one below), not to mention cosplay events that may as well be photo gear conventions. Whenever I see people ending up with shots with dark backgrounds or pale as ghost subjects even when the day is perfectly bright and clear(high shutter + direct flash)… I can’t help but feel curious, are you the master of your equipment or do they master you?
Note: for tips on purchasing Speedlights, refer to Dedicated to new photography fans, six thoughts on purchasing Speedlights

Image above: a cosplay convention akin to one for photography equipment
The first key of using Speedlights: the “shutter speed” is what decides the brightness of the background, relying on Speedlight flashes is definitely not the answer.
I’ve already used this image as an example in the last article, but I can’t help but put it forward again, there are just too many shades to be thrown at this series of photos! Though for all its faults, this series of photos do provide excellent counter-examples, as it employed my most hated method of shooting: combining high shutter speed with direct flash light. Direct flash is when one positions the Speedlight to flash directly at the subject, resulting in the subjects having a ghostly pale complexion, as will be explained later in this post. For now, I will be talking about the fast shutter.
Many users nowadays tend to over-rely on TTL to automatically adjust the flash for them, and when the exposure is insufficient, they only know to adjust the EV setting as told by the “experienced” users online. The result is an abundance of photos like the one above. If you’ve read my post from last week, you’ll know that Speedlights are limited to their maximum output power, and can only illuminate a small area in front of the photographer. Now back to the image, if the power of the flash is increased in order to illuminate the back of the train, the subjects in the frame will end up being over exposed, which is a huge problem.
Then how should the problem of the dark background be solved?

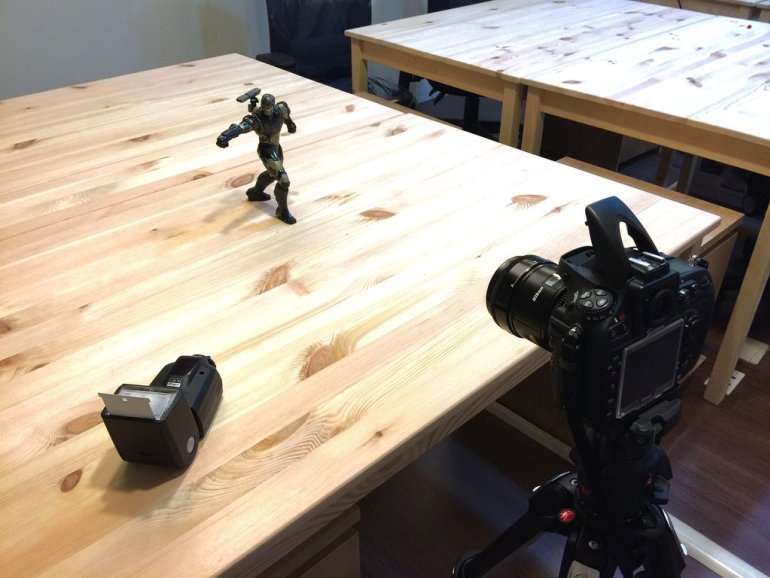
Due to it being impossible for us to actually borrow a subway carriage for lighting demonstration, we’ll allow the War Machine figurine in our office that favour.
As can be seen in the above image, I generally use manual focus and spot metering(my usual habit) when shooting. First, let’s set the background as the metering point, yielding the correct exposure value of 1/20s. This number means that when no flash is used, 1/20 seconds is enough to get sufficient exposure for the background. In contrary, if the shutter speed is lower than 1/20 then the background will be too dark. Additionally, due to the limit of flash output and the foreground object, no matter how you set the flash it will only be able to illuminate the subject(War Machine figurine) and will not be able to control the brightness of the background(as mentioned before, the subject will be overexposed if you attempt to illuminate the background).

image above:1/20s f2.8 ISO100
You can see that under 1/20s plus flash, the result creates a nice shine that reflects the texture of the figurine while considering the brightness of the background, preventing an image with an overly bright subject and a dark background. Then what if a fast shutter is used?

While the War Machine in this image looks similar to the previous image at 1/20s, the background is a lot darker this time. This is because while the flash can brighten the subject, this level of output is not enough to illuminate the background, unless you have two Speedlights to deal with that problem, or else the only way to deal with a dark background is to extend the exposure time. As for whether or not this will cause the subject to become blurry? Speedlights actually have a very strong “frame freezing” effect, so unless your subject moves at a fast speed, no slight movements will be captured before 1/20s.
However do note this, when using long shutter speed to capture background light, often, the light in the scene will also be taken in by the camera, losing the “overpowering(the flash overpowering natural light)” effect. Therefore if the goal is to overpower the messy lighting in the background(such as colorful stage lights), two or more Speedlights will be required to fill in the lighting for the subject as well as overpowering the scene. This is a technique much more complicated, so we save that for later.
Second key of using speedlights: The factors that decide the overall brightness are “aperture”, “flash intensity” or “ISO”, the exposure time only affects the background brightness

image above:1/8s f2.8 ISO100
After dealing with the background brightness, what if the overall brightness after flash still isn’t enough(or too much)? What settings should be adjusted to solve that problem? Actually, the earliest Speedlights only have the option to flash at “full intensity”, therefore in order to adjust the overall brightness of the photo, the only option is to change the “aperture” and “ISO”. Raising the ISO will make the image brighter overall, not much needs to be said about that, though “aperture adjustment” does deserve some discussion.

image above:1/8s f8 ISO100
As discussed previously, when activating the flash, the closest subject will be illuminated. So no matter how fast the shutter is, it matters not to the instantaneous flash. This is why even if there is a twelve-times difference in the shutter speeds in the two previous demos, the brightness of the subject in both pictures doesn’t seem much affected. Though on the other hand the aperture and ISO both directly influence or limit the overall brightness of the image, therefore in order to adjust the photo brightness after activating the flash, one should turn to the aperture and ISO settings.
As evident in the image above, under the same exposure condition, by shrinking the aperture one can also adjust the overall exposure of the image. Now comes another question: when changing the brightness, when should the aperture be adjusted and when should the ISO be considered?
Lets refer back to the two images above, have you noticed the shallower depth of field in the f2.8 image before the last one? Under the same focal length, adjusting the aperture is the only way to control the depth of field, thus you must put the depth of field as your priority during shooting(for instance group photos or macro photography both requires a deeper depth of field). You should first adjust the aperture to your desired value, then tune the ISO to modify the overall brightness. Though if it does not matter to you either way, so long as the scene is bright enough, then adjusting the aperture would be much faster(since usually adjusting the ISO requires a lot of button pressing, while adjusting the aperture is as simple as turning a knob).

Nevertheless, speedlights these days are no longer like the ones that came before, it is possible to directly alter the flash intensity to modify the scene brightness. For instance in the above image, German Metz speedlights allow users to adjust the EV of the lights in ½ increments(the TTL mode relies on EV adjustments to alter flash intensity), and the highest possible setting is EV +3. If you have already attempted the adjustment of ISO and aperture size and still cannot obtain a desirable exposure, then try modifying the EV to control the flash power. However, sometimes the TTL mode of speedlights could be overburdened by the amount of camera settings resulting in operational errors, therefore if you’re not in a rush, why not try to manually adjust the settings in the M mode.
Third key of using speedlights: Key element to realising “light and shadow” effects: angle of the flash
Direct flash is a recurring term in the previous paragraphs. It means to have your Speedlight face your subject directly when activating the flash, illuminating the object without any diffusion or reflection. Generally speaking, this is how built-in flashes of cameras or cellphones work. Though while it is effective indeed in illuminating objects, the results are often ugly and distasteful:

The above image is an example of direct flash. See how due to the light directly shining at War Machine, not only does the color end up being lifeless and dull, the entire object immediately seems flattered and condensed due to the direct light, causing the finely detailed figurine to appear cheap and unrefined. Here a lot of people may think: Didn’t I already add a diffuser to my flash? Why does this still happen?
Be sure to remember this, in order to achieve the bounce flash effect(to be explained later) by diffusing the flash for close-up shots, you will need a diffuser that is at least the size of a frying pan. Those mini objects roughly 15cm in diameter mounted on top of a camera cannot achieve a real diffusion effect. I consider them no more than fancy gadgets for self-comfort and showing off. If you really cannot bounce your flash(no ceiling or if the ceiling is too high) and need to use flash for close-up shots(ex. When shooting Show Girl), then I recommend a certain purchase: ring diffusers. These things have a good effect on Speedlights, though since I didn’t buy one, I’ll talk about it some other day.

What exactly is bounce flash then? Bounce flash means to first point the Speedlight elsewhere, and have the light bounce back to hit your subject.
The bounce flash in the previous image bounces off the ceiling to achieve the largest scale of diffusion, preventing the light from overly concentrating on the subject. However, flash bouncing is not limited to using the ceiling, it can also bounce off walls to create a different lighting atmosphere. Furthermore, a large reflector can also be used to control the direction the light bounces. Often in studios, “umbrellas(called umbrella reflectors)” could be seen stuck onto Speedlights for the exact purposes. The principles are the same, utilizing the reflective properties of light to diffuse the flash from the Speedlights, preventing direct hits and are much more efficient than diffusers.

Personally, I think bounce flash is the most natural way to set up lighting. Especially when bouncing off ceilings to simulate natural light, that way not only the angle would look natural, the surface reflection of the object would also look more textured and closer to reality. As for color temperature and what not, I don’t think there would be any problem as long as you shoot in RAW. So for beginners, I usually just recommend bouncing the flash off the ceiling, as it is a more promising way to ensure the photo’s quality.

If your Speedlight supports off-camera flash, then you can utilize different angles to create a different kind of effect setups. Above is an example using vertical reflection and bounce flash to lit up War Machine diagonally.
(The built-in flash on the camera is used to command the external speedlight and not to function itself, this is a convenient function of Nikon cameras.)
This way, it is possible to produce a shot like the one seen above with special effects such as diagonal shadows or one-sided lighting. Though the above example is also only meant to be a demonstration, in reality, reflectors and diffusers should also be used to improve the quality of the effect, refining the image as seen below:

This is a shot taken in a mini photo studio, by placing an off-camera flash on the side, a difference in brightness is created, setting up a specific lighting mood. If your interest lies in commercial product photography and studio portrait photography, these types of lighting techniques will be essential skills for you to master. In regards to when I will start teaching these skills? I reckon it will have to wait until I’ve bought me some studio lights! Lastly, please enjoy this side light portrait of this lovely lady.

LIKE OUR PAGE: